Categories are a great way to organize your products for quick access in Restaurant POS. Create regular categories to group your similar products, such as Starters and Mains, and create special categories for discount and service charge products. As discounts can be applied to products within specific categories, you can also create categories to group products for the purpose of discounting. See Creating Discounts.
- In Restaurant Manager, click Products > Categories on the navigation menu.
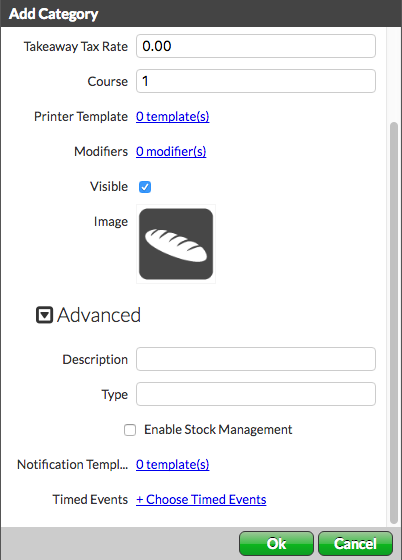
- Click Add Category.
- Specify the settings and click OK.
Settings
| NAME |
Category name to display in Restaurant POS |
| TAX RATE | Default tax rate for products in the category. |
| DELIVERY TAX RATE |
Default delivery tax rate for products in the category (if required). |
| TAKEOUT TAX RATE | Default takeout tax rate for products in the category (if required). |
| COURSE |
Course number for products in the category. When an order prints to the kitchen, items from different courses are separated on the ticket. For example, if you set an Appetizer category as course 1, and a Main category as course 2, the kitchen ticket displays the appetizer items first and the main items second, separated by a line. A course popup window appears when printing an order to the kitchen in Restaurant POS. The lowest course number is displayed as course 0 on the course popup, with subsequent courses appearing as course 1, 2, and so on. |
| PRINTER TEMPLATE |
Printer template assigned to products in the category. Because a printer template is assigned to a printer in your system, this is the printer, such as bar printer, kitchen printer, that the product orders are sent to. |
| MODIFIERS |
Modifier selections for products in the category. |
| VISIBLE |
Whether or not the category is available for selection in Restaurant POS. |
| IMAGE |
Image for the category button in Restaurant POS. Image upload is available on computers only. You can't upload images from an iPad or Phone. For more information on adding images to categories, please see the article Adding images. |
Advanced options
| DESCRIPTION |
Enter a description for the category. |
| TYPE | Category type, such as Imported Beer or Lunch Item for similar categories. When you generate a Day Report, the Revenues by Type section displays a breakdown of sales per category type. If the same type is assigned to more than one category, the Day Report displays the combined revenue for the associated categories. |
| ENABLE STOCK MANAGEMENT |
If the stock management feature (see About Stock Management) is enabled, this enables stock management for products in the category. |
| NOTIFICATION TEMPLATE | Select a notification template to be applied to the category. This notification will signify that another part of the order has been sent to a different printer in the system. Recommended for use in kitchens with multiple preparation stations. See Creating Printer Templates for more information on creating Kitchen/Bar template types. |
| TIMED EVENTS | Select the Timed Events you want to assign to each product in the category. |
What's next
Assign products to the category. You can create a new product (see Creating Products) and assign it to the category, or move a product to the category.