The Ingenico Desk5000 is a countertop terminal available through Moneris. Before using the terminal, make sure it is connected to Lightspeed Restaurant (See Setting up the Moneris Desk5000).
This article explains how to use your Moneris Desk5000 terminal. Follow the steps below to understand and process transactions with the Desk5000:
- Understanding the Desk5000
- Processing a payment
- Processing a refund
- Closing a batch
Understanding the Desk5000 terminal
The Ingenico Desk5000 is a countertop payment terminal from Moneris used to process transactions at your point-of-sale (POS) station. The Desk5000 is directly wired to your network through an ethernet connection and integrates with Lightspeed Restaurant. Since the Desk5000 communicates directly with Lightspeed Restaurant POS, there's no need to manually apply payments on the terminal – simply tap the associated payment button on the POS to prompt the terminal for payment. You then pass the terminal to the customer to apply their payment method and desired tip amount. When the customer is finished entering their payment information, they pass the terminal back as directed on screen. The terminal combines touchscreen and keypad technology for an intuitive experience.
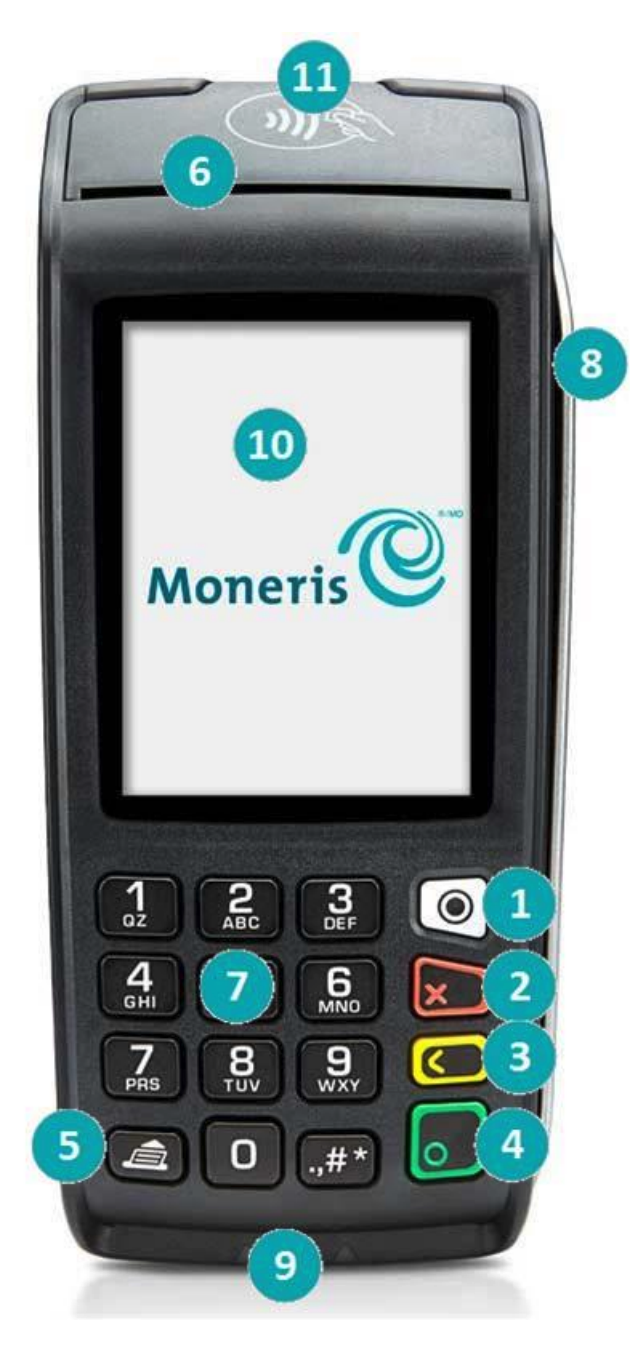
| 1. Menu key | Used to access the Main Menu. |
| 2. Red key | Used to cancel an action or payment (same function as the Cancel button on screen). |
| 3. Yellow key | Used to delete one or more characters or to go back (same function as the Delete button on screen). |
| 4. Green key | Used to accept or submit data (same function as the OK button on screen). |
| 5. Paper feed key | Used to advance receipt paper. |
| 6. Printer | This is where the terminal prints receipts. |
| 7. Keypad | Used to enter numerical data, such as when applying a tip amount. |
| 8. Magnetic strip reader | Reads card information when the card is swiped. |
| 9. Chip reader | Reads card information when a chip card is inserted. |
| 10. Display screen | Displays information and touchscreen prompts. |
| 11. Contactless reader (internal) | Reads card information when a card is tapped. |
Processing a payment
- If you're in Table Service mode: from the Payments screen in Restaurant POS, tap the payment type associated with the Desk5000 terminal.
- If you're in Quick Service mode: from the Order screen on the Restaurant POS, tap the payment button associated with the Desk5000 terminal.
- The POS will send the payment to the terminal. Pass the terminal to the customer for completing the transaction.
- If tipping is enabled, the terminal will prompt the customer to add a tip.
- The customer can then swipe, insert or tap their card to confirm payment.
- If the terminal is not on a swivel stand, retrieve the terminal from the customer.
- Once the payment is approved, the payment will process automatically on the POS screen.
- Press the green OK button on the terminal to return to the main terminal screen.
Note: to process manual payments, the terminal must be in Standalone mode. This means your temporarily pausing the connection between the terminal and Restaurant POS. To put the terminal in standalone mode, tap the grey Menu button, swipe right to left and select Standalone mode. The process is the same for returning to core semi-integrated mode.
Processing a refund
On the occasion that you might need to refund a payment, you can do so directly from Lightspeed Restaurant POS. Note that you'll need the original terminal that the transaction was processed on along with the customer's card to complete the refund. It is possible to process refunds up to one week after a transaction was originally made. Note that depending on your POS settings, only certain users are able to unfinalize a payment and process a void.
- Open the payment to be refunded on Restaurant POS.
- On the Payments screen, swipe left to right on the payment line to unfinalize the payment.
- Once the payment is unfinalized, the receipt will reprint.
- To trigger a refund, swipe left to right again on the payment line. Tap Refund.
- This will enable payment voiding on the POS screen, and on the terminal. A message on the terminal will appear asking for the admin user ID and pin.
- Pass the payment terminal to the customer.
- Ask the customer to swipe, insert or tap their card and follow the prompts on screen to complete the refund.
-
- The card used to process the refund must be the same card used for the original transaction.
-
By default, Moneris terminals have a refund limit of $5,000 for credit card transactions and $0.00 for debit card transactions. To set up or change your refund limit, please contact Moneris directly.
Closing your batch
In order to close out all the credit/debit transactions for the day and send the funds to your account, a batch must be closed on the terminal each day. A batch includes a group of transactions for the applicable business day. Closing a batch sends the payments for processing so the funds appear in your bank account. If your account is set to system close, Moneris automatically closes the batch for you at the end of the business day (11pm local time). If your account is set to merchant close, you must manually close the batch directly on the terminal at the end of your business day. To set up merchant close, please contact Moneris directly.
- To manually close your batch, please note that the terminal must be in standalone mode. To put the terminal in standalone mode, tap the grey Menu button, swipe right to left and select Stand Alone mode.
- From the Main menu, select End of Day and then Close batch.
- Follows the prompts on screen.
- Once complete, your batch details will print out from the device and the batch is now closed. Repeat the process on any other terminals you have.
- Return the terminal to Semi-integration mode using the same process as above.