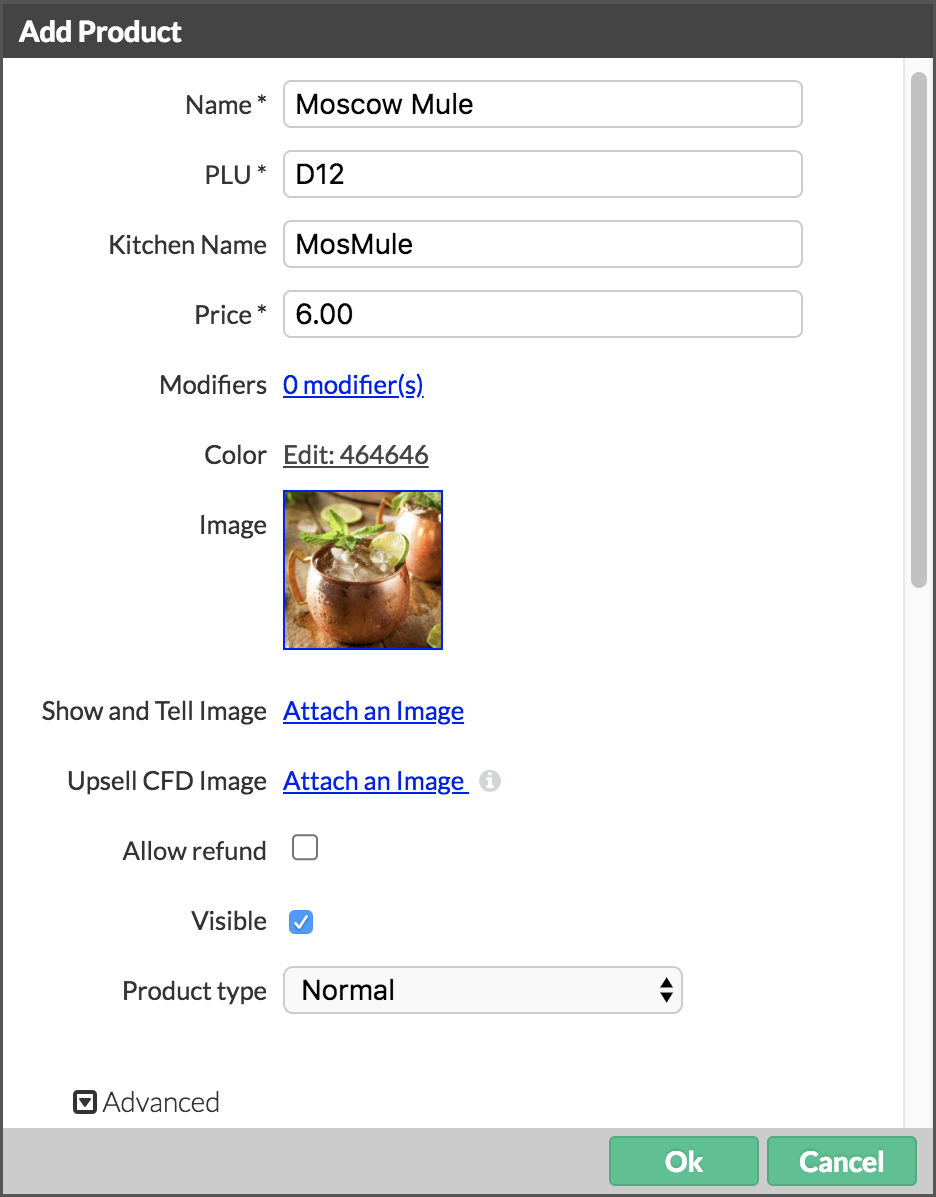
Use these instructions to create standard food and beverage products in Lightspeed Restaurant. To avoid having to move your products to categories one-by-one, we recommend that you create your categories first and then select the appropriate category when creating your products.
If you have a multi-location account (more than one restaurant linked to the same account), when you create or edit a product you can select the locations you want to apply the changes to after you save the product. These changes can only be made from the master account.
See About products for information about the product types in Lightspeed Restaurant.

- In Restaurant Manager, click Products > Products on the navigation menu.
- Click the category you want the product to be in.
- Click Add Product.
- Specify the settings and save your changes.
Settings
| NAME | Product name to display in Restaurant POS. |
| PLU | Product look-up code, also known as the ID. This code is automatically generated when a new product name is entered and uses the first letter of the category followed by a number sequence, but it can be updated as needed. The PLU can be used at the POS to look up a product, and it appears in reporting. |
| KITCHEN NAME | Add a different name to display on the kitchen ticket (optional). |
| PRICE | Unit price for the product. |
| MODIFIERS | Modifiers for the product. |
| COLOR | Color assigned to the product button on the Order screen. |
| IMAGE | Upload or select a product image to display in the product details view. Supports PNG, JPG, and GIF image files (500 KB maximum). See Using the Product Detail screen for more information. |
| SHOW AND TELL IMAGE | Upload or select a product image to appear on Lightspeed Kitchen displays. This setting is only available when Lightspeed Kitchen is enabled. See About Lightspeed Kitchen for more information. |
| UPSELL CFD IMAGE | Upload or select a product image to appear on Lightspeed Customer Facing Displays (CFD). This setting is only available when CFD is enabled. See About Customer Facing Display for more information. |
| ALLOW REFUND | Controls whether the product is refundable in Restaurant POS. See Setting up refundable products for more information. |
| VISIBLE | Sets whether the product is visible in Restaurant POS. |
| PRODUCT TYPE |
Affects what happens when the product is selected on the Order screen in Restaurant POS:
|
Advanced Options
| TAKEOUT PRICE | Takeout price for the product. Select =price to set the takeout price to the regular product price. |
| DELIVERY PRICE | Delivery price for the product. Select =price to set the delivery price to the regular product price. |
| TAX RATE | Tax rate for the product. New products automatically inherit the category’s tax rate. |
| BARCODE | Product barcode. |
| DELIVERY TAX RATE | Delivery tax rate for the product. |
| TAKEOUT TAX RATE | Takeout tax rate for the product. |
| DESCRIPTION | Provide additional product information when viewing product images and descriptions in the product details view. See Using the Product Detail screen for more information. |
| COST | Product cost. |
| TIMED EVENTS | Select any timed events you want to assign to the product. See Creating timed events for more information. |
| INGREDIENTS | Click Choose Ingredients to assign ingredients to the product. To add a new ingredient to the product, select the ingredient from the list, enter the unit quantity for the ingredient and click +. |
| ENABLE STOCK MANAGEMENT |
If stock management is enabled (see About Stock Settings), and the product’s category has stock management enabled (see About categories), this enables or disables stock management for the product. When enabled, the product’s stock level is tracked, and appears in reports (See Product reports). When disabled, the product’s stock level is not tracked, and does not appear on reports and in Restaurant POS.
|
What's next
After creating your products, you can also choose to create fixed or choice menus. See About menus.