Set up an EMV-enabled Genius Handheld payment terminal for use with Cayan integrated payment processing in Lightspeed Restaurant POS.

Setup includes the following:
- Obtain your POS credentials from Cayan
- Set Cayan as the payment gateway in Lightspeed Restaurant
- Update the terminal to the latest version
- Connect the terminal to the network
- Find the terminal's IP address
- Add the payment terminal to your iPad
- Enable tipping on the terminal
1. Obtain your POS credentials from Cayan
To configure Cayan as a payment type in Lightspeed Restaurant, you need to first obtain your POS credentials from Cayan. Typically, your credentials would have been sent to you by email from Cayan. If you don't have this information on hand, please contact Cayan support.
| Cayan POS Credentials | |
| Username |
This is the name of the account as it appear in Cayan. NOTE: This is not the username used to login to a virtual terminal. |
| Password | This is the transaction key. |
| Site ID | This is the site ID. |
| Full name |
This is the name of the account as it appears in Cayan. NOTE: This is the same as the username. |
2. Add Cayan as a payment processor in Lightspeed Restaurant
NOTE: Your location settings in Restaurant Manager must be set to a Cayan supported region.
- In Restaurant Manager, click Payments > Payment Processors.
- Click Cayan.
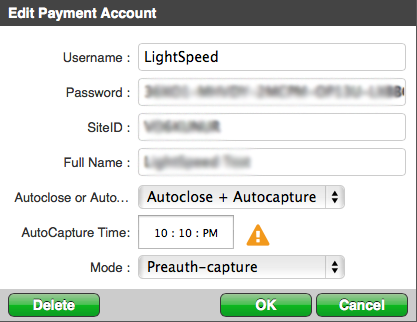
- In the Edit Payment Account popup, enter your Cayan credentials.
-
For the setting Autoclose or Autocapture, it is recommended that you select Autoclose + Autocapture. This setting allows you to specify an AutoCapture Time. Up until the AutoCapture Time, payments and tips can be manually adjusted in Restaurant Manager or in Restaurant POS via the Orders List. After the AutoCapture Time, payments will no longer be editable in Restaurant POS or Restaurant Manager. Shortly after the AutoCapture Time, the batch will Autoclose, meaning the payments will be archived in Lightspeed Restaurant. However, in order for funds to be deposited into your account, you must arrange an auto-close time with your payment processor.
Note: If you would prefer to manually capture and close your batch, see Manually capturing and closing batch payments. -
For the Mode, it is recommended that you select Preauth-capture. Note that if you select Sale, you will not be able to adjust tips or paid amounts after they are processed.
- Click OK to save and exit.
3. Update the Genius Handheld app to the latest version
Ensure that your Genius Handheld device is running the latest software version at all times.
- On the Genius Handheld device's home screen, tap the Cayan Files icon.
- Tap the
 icon.
icon. - Tap Update Repos from the drop-down menu.
- If an update is available, tap Update.
- Tap Install.
4. Connect the terminal to the network
The Genius Handheld payment terminal is connected to your network using WiFi.
- Connect the Genius Handheld payment terminal to your local network via WiFi.
- To power on the terminal, press the power button on the top of the device.
- On the device's home screen, tap Settings > Wi-Fi.
- If Wi-Fi is not on, enable it.
- Select your network by name.
- Enter your Wi-Fi password.
- Tap Connect.
- You can now return to the home screen.
5. Find the device's IP address
You will need to know the IP address of your Genius Handheld device in order to configure it with Lightspeed Restaurant.
NOTE: To ensure the Genius Handheld network IP address does not change, it is recommended to assign a static IP address for the Genius terminal in your router settings.
- From the device's home screen, tap the Genius icon.
- Tap the information button
 .
. - Take note of the IP address displayed under My IP Address. You will need this to complete the configuration process.
- Tap the return button to go back to the Genius by Cayan idle screen.
6. Add the Genius Handheld in Restaurant Manager
Add the device as a Payment Terminal in Restaurant Manager:
- In Restaurant Manager, click Payments > Payment Terminals.
- Click Add Genius.
- Enter a Label and a Description for your Genius device. For example, "Genius 1".
- Enter the IP address of the Genius Handheld terminal.
Create a Payment Type for the Genius in Restaurant Manager:
- In Restaurant Manager, click Payments > Payment Types.
- Click Add Payment.
- Enter a Name and Description for the payment type as you want it to appear in Restaurant POS.
- From the Type drop-down menu, select Cayan Genius.
- Click OK to save and exit.
7. Enable tipping on the terminal
You will need to contact Cayan in order to have them activate tipping on your device. Have the serial number of at least one of your terminals on hand for them to push the feature to your devices.
What's Next?
Clear your cache in Restaurant POS and see Taking payments and tips to learn how to process payments with your Genius Handheld terminal.