After setting up your Dejavoo Z9 terminal, learn how to process payments and tips. This article discusses the following Dejavoo Z9 terminal actions:
- Processing a payment
- Processing a manual transaction
- Understanding receipt components
- Adjusting tips
- Processing a refund
- Printing a daily summary report
- Manually closing a batch
- Setting up automatic batching

Processing a payment
- From the Payments screen in the Restaurant POS app, tap the payment type associated with the Z9 terminal. If you have more than one terminal, you will be prompted to choose which one you want to use. Once selected, Restaurant POS will send the transaction to the terminal.
- Verify the terminal is displaying the payment amount from Restaurant POS and then hand the terminal to the customer to complete the transaction.
- If tips are enabled on the Z9, the terminal will prompt the customer to add a tip.
- After confirming the correct sales amount, the customer presses OK.
- The customer will then need to swipe, insert or tap their card to process the payment.
- Once the payment is approved, press the green OK button.
- A merchant copy of the transaction receipt will print.
Processing a manual transaction
- From the MAIN MENU, press the word SALES on the touch screen.
- Enter the transaction amount and press the green OK button.
- Pass the terminal to the customer to complete the transaction.
- If tips are enabled on the Z9, the terminal will prompt the customer to add a tip.
- After confirming the correct sales amount, the customer presses OK.
- When prompted to enter/swipe/tap a card, enter the card number manually using the keypad and press OK.
- Enter the card’s expiration date and press OK.
- Select YES if you have the card at hand or NO if not.
- If you selected NO, you will be prompted to enter the card’s AVS number (three digits at the back of the card).
- If the signature on device option is enabled, the customer will be prompted to sign directly on the payments terminal before pressing OK.
- Once the transaction is finished processing, you will be prompted to press any button to print a merchant copy of the transaction.
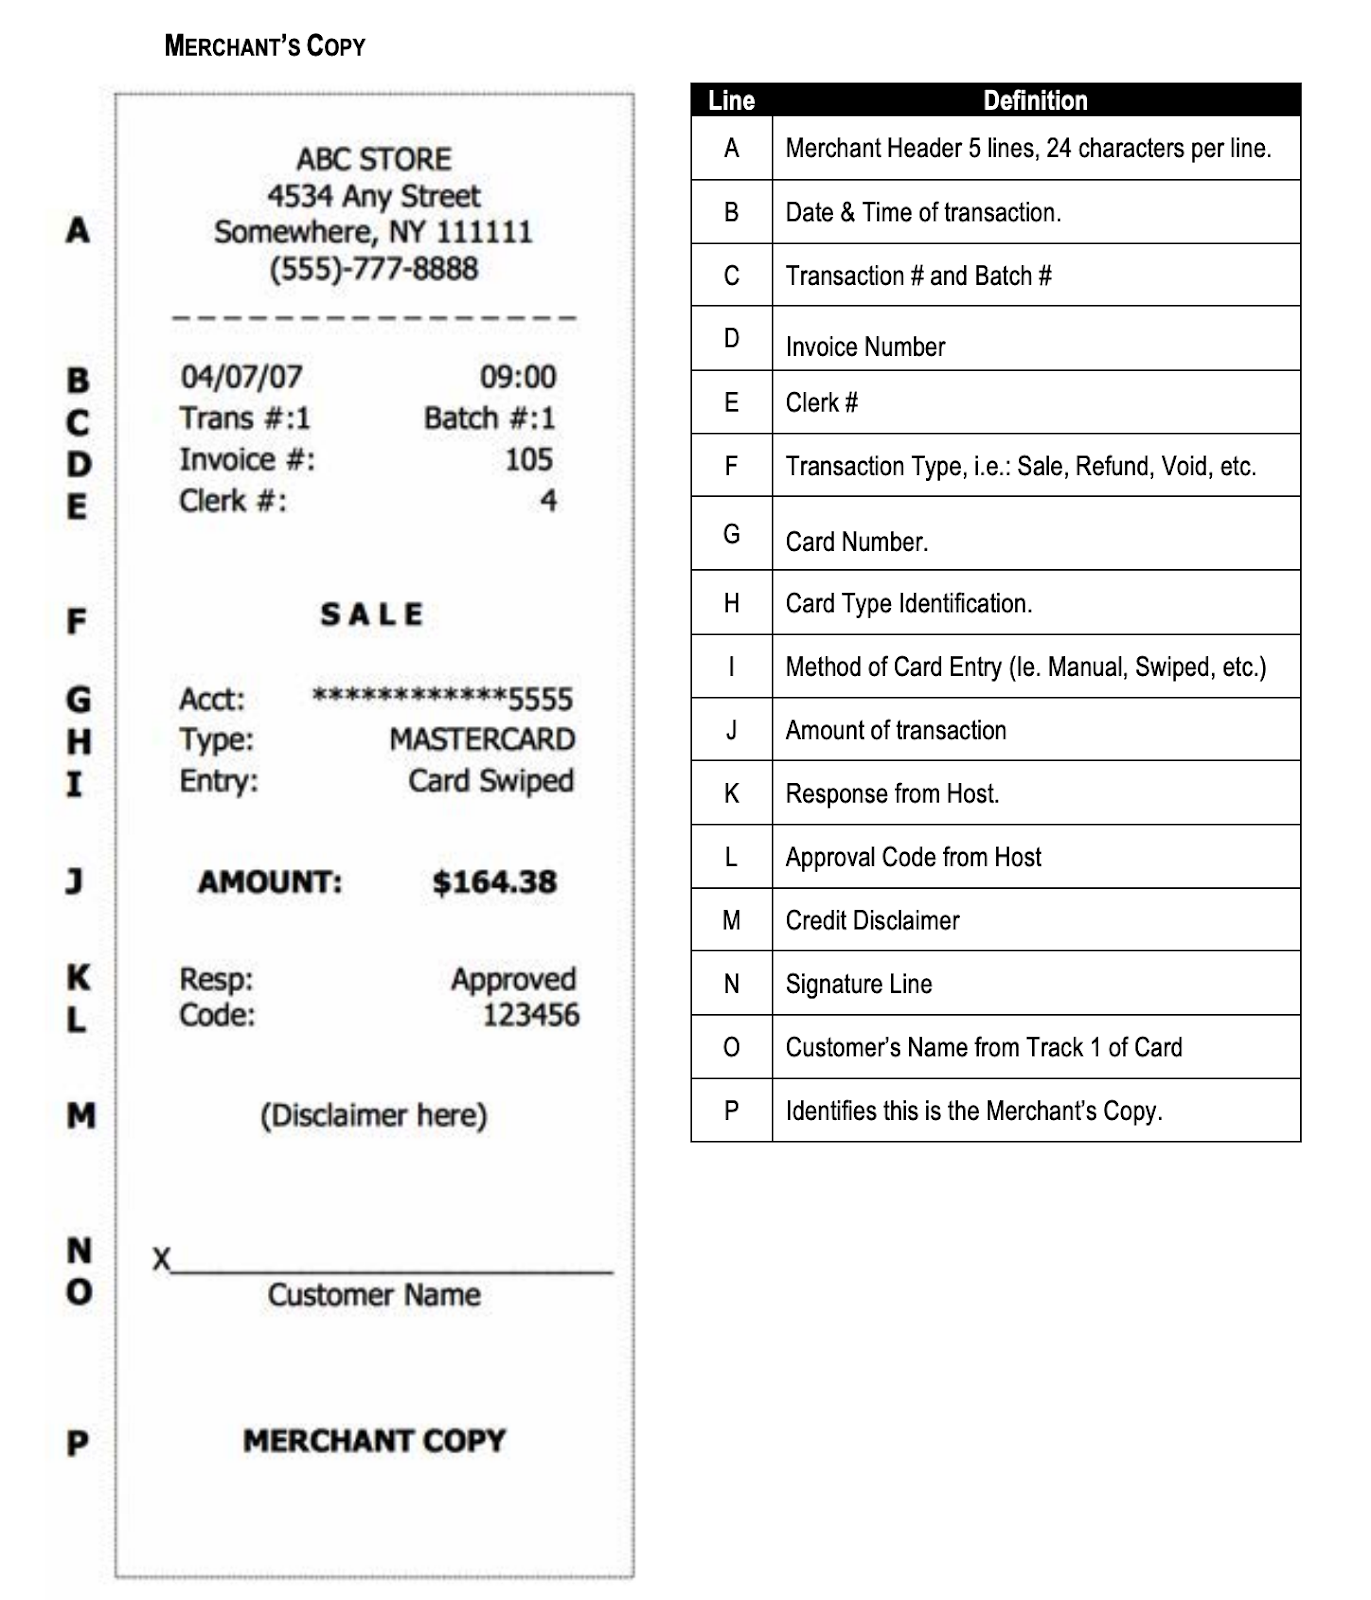
Understanding Dejavoo Z9 receipt components
Once a payment has been processed, the Dejavoo Z9 terminal will print a receipt with unique information on the transaction. Understanding the components of this receipt is important for identifying a transaction number or the details of a payment. See the image below for an example of receipt details:
Adjusting tips
- Press the green OK button to access the CORE MENU.
- Select APPLICATIONS.
- Select TIPS AND TABS.
- Enter manager password and press OK.
- Select EDIT TIPS.
- Select ALL.
- Select TRANSACTION NUMBER.
- Enter the transaction number found on the receipt (see image above) using the keypad and press OK.
- The base amount of the transaction will show at the top of the screen, enter the amount of tip using the keypad and press OK.
- Press the yellow BACK button until you are back at the transaction number prompt if you wish to edit more transactions, or until taken back to the MAIN MENU if you are done adjusting tips.
Processing a refund
Note: When processing a refund on the Z9 terminal, you will also need to void the receipt in Lightspeed.
- From the MAIN MENU, press the word SALES on the touchscreen.
- Scroll down by swiping up on the touch screen until you can select CREDIT.
- Using the keypad, enter the amount to be credited and press the green OK button.
- Using the keypad, enter your password and press OK.
- You will be prompted to enter/swipe/tap a card or manually enter the card number.
- If enabled, your customer will be prompted to sign directly on the payments terminal and press OK.
- Press any button. A customer copy will be printed first, then the merchant copy.
- Press YES on the touchscreen, or the green OK button, to be taken back to the MAIN MENU.
Printing a daily summary report
Transaction and tip amounts cannot be adjusted after the batch has been closed. As such, it is a good practice to review your settlement reports everyday before closing your batch. You can view your daily transaction from the Worldpay web page, or print a daily report on the terminal (this option only shows transactions processed on a given terminal and needs to be completed for each device). Here’s how to print the daily report from the terminal:
- Press the green OK button to access the CORE MENU.
- On the touchscreen, press REPORTS.
- On the touchscreen, press DAILY REPORT.
The report will print and the terminal will return to the CORE MENU.
Manually closing a batch
It’s important to close a batch on each Z9 terminal daily. Closing a batch means to send your daily sales to be processed by Worldpay and then deposited into your bank account. You can manually close your batch at the end of your business day for each terminal, or you can set up automatic batching at your business. To manually close the batch, complete the following steps at the end of your business day for each Z9 terminal:
- Press the green OK button to access the core menu.
- On the touchscreen, select SETTLEMENT.
- On the touchscreen, select SETTLE DAILY BATCH.
- Enter your password and press the green OK button.
- The terminal will proceed to settle the batch.
- Once done, a batch settlement report will print and an approved message will show on the screen.
If you get the message BATCH SETTLEMENT FAILED, please make sure that the terminal is connected to your network and try again. If the problem persists, please contact Worldpay.
Setting up automatic batching
Complete the following steps for each Z9 terminal at your business to set up automatic daily batching:
- Press the green OK button to access the CORE MENU.
- On the touchscreen, select SETTLEMENT.
- On the touchscreen, select BATCH SETTINGS.
- On the touchscreen, select NO DIAL.
- Use the keypad to enter the desired batch settlement time and press the green OK button (Time format is in 24 hours clock).
- Use the keypad to enter how many minutes before the terminal should retry to close the batch, should the first attempt be unsuccessful, and press the green OK button.
- Use the keypad to enter the time period during which the terminal should keep trying to close the batch when failing and press the green OK button.
- The terminal will return to the CORE MENU.
Note: Transaction and tip amounts cannot be adjusted after the batch has been closed. As such, it is a good practice to review your settlement reports everyday before closing your batch.