The Ingenico Move5000 is a countertop terminal available through Moneris. Before using the terminal, make sure it is properly set up and ready to process transactions (see Setting up the Moneris Move5000).
This article explains how to use your Moneris Move5000 terminal. Follow the steps below to understand and process transactions with the Move5000:
Understanding the Move5000
Instead of prompting for payment from the POS screen, use the Move5000 to directly process payments where your customers are: meet your customers tableside and process transactions all from the terminal. With the Move5000, there is no need to select a payment button on the POS for card payments because payments are prompted directly from the terminal.
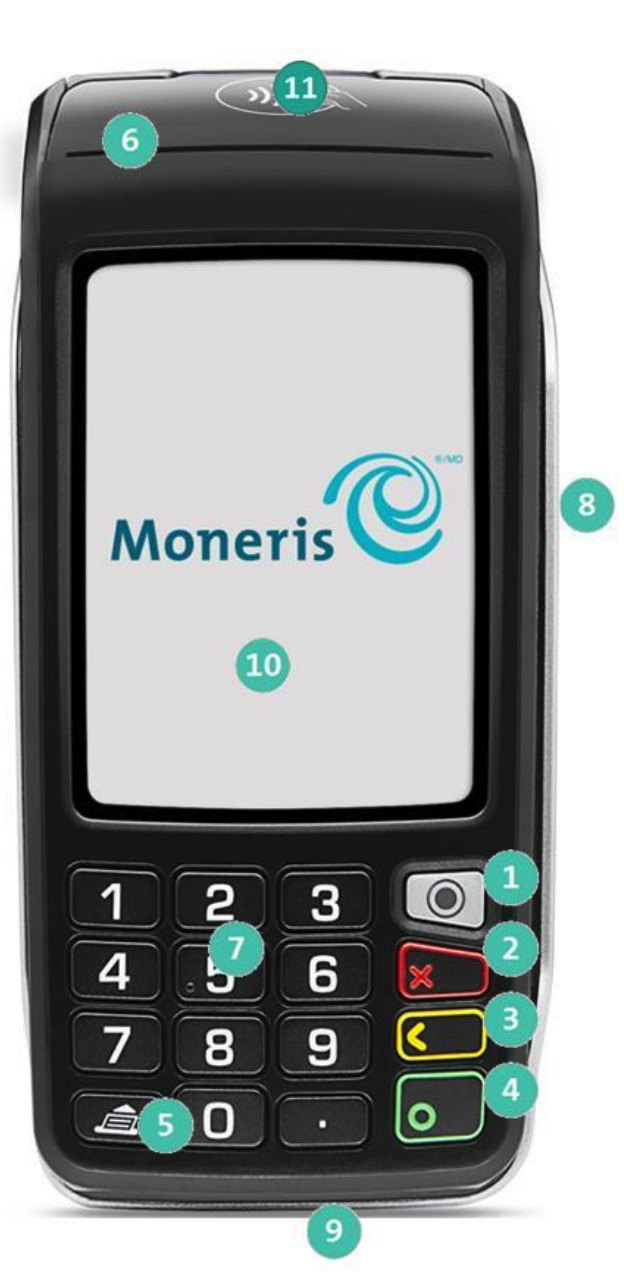
| 1. Menu key | Used to access the Main Menu. |
| 2. Red key | Used to cancel an action or payment (same function as the Cancel button on screen). |
| 3. Yellow key | Used to delete one or more characters or to go back (same function as the Delete button on screen). |
| 4. Green key | Used to accept or submit data (same function as the OK button on screen). |
| 5. Paper feed key | Used to advance receipt paper. |
| 6. Printer | This is where the terminal prints receipts. |
| 7. Keypad | Used to enter numerical data, such as when applying a tip amount. |
| 8. Magnetic strip reader | Reads card information when the card is swiped. |
| 9. Chip reader | Reads card information when a chip card is inserted. |
| 10. Display screen | Displays information and touchscreen prompts. |
| 11. Contactless reader (internal) | Reads card information when a card is tapped. |
Processing a payment
|
💡 What is a user PIN? A user PIN is a unique four-digit number used to access Lightspeed POS ordering screens and to process transactions on the Move5000. A PIN tells the Moneris terminal which POS user is processing the sale. As such, if you're using the Move5000, you'll need user PINs set up for each Restaurant POS user. For more information on creating user PINs, see Creating users. |
- From the POS, open the transaction and prepare the order for payment. Split the bill if required, and print a copy of the receipt to bring to the customer.
- Go back to the floor plan view or user login screen once you have completed the preparations.
Note: Ensure you left the order or payment screen of the order and no one else is also still on the POS order or payment screen for that account. The open account will not be displayed on the Moneris Move5000 if there is still someone on the account at the POS. - If the customer is ready to pay for their order, bring the Move5000 terminal to the customer.
- Select the red button on the terminal keypad. The following screen will show a server ID field with a flashing cursor prompting the user to enter their 4-digit Lightspeed Restaurant user PIN.
- Enter your Lightspeed Restaurant user PIN in this field. This tells the Moneris terminal which POS user is processing the sale.
- Select the table you wish to apply a payment on.
- Pass the terminal to the client and allow the client to select a tip amount.
- Once the client completes the payment, select the green button on the keypad to complete the transaction and print a receipt.
- Note: this action also finalizes the order on Restaurant POS.
Note: to process manual payments, the terminal must be in Standalone mode. This means your temporarily pausing the connection between the terminal and Restaurant POS. To put the terminal in standalone mode, tap the grey Menu button, swipe right to left and select Standalone mode.
Processing a refund
On the occasion that you might need to refund a payment, you can do so by first unfinalizing the payment on the POS and then processing the refund on the Moneris terminal. Note that you'll need the original terminal that the transaction was processed on along with the customer's card and payment slip. It is possible to process refunds up to one week after a transaction was originally made. Depending on your POS settings, only certain users are able to unfinalize a payment and process a void.
Initialize the refund from Restaurant POS:
- Open the payment to be refunded on Restaurant POS.
- On the Payments screen, swipe left to right on the payment line and select Void payment.
- A warning message will appear at the top of the screen asking the user to unfinalize the receipt. Tap Unfinalize.
- Tap Void payment once again on the payment line. This will enable payment voiding.
- Now, move to the payment terminal to complete the refund process.
Complete the refund on the Move5000:
- On the Move5000 terminal, place the terminal in Standalone mode. The terminal must be in Standalone mode to complete a refund.
-
- Put the terminal in Standalone mode by tapping the grey Menu button on the terminal. Swipe right to left on screen and tap Stand Alone on the screen display.
-
- Proceed with processing the refund. From the Main menu on the terminal screen, tap Transactions > Refund.
- In the passcode field, enter your Moneris admin user passcode and then press OK.
-
-
- Your admin user passcode is an optional security credential often created when setting up your terminal. See Setting up the Moneris Move5000 for more information.
-
-
- Enter in the amount to refund on the terminal keypad and then press OK.
- Enter the authorization number of the original payment.
-
-
- The authorization number is found on the original terminal payment slip beside the line Auth #.
-
-
- Pass the payment terminal to the customer.
- Ask the customer to swipe, insert or tap their card and follow the prompts on screen to complete the refund.
-
-
- The card used to process the refund must be the same card used for the original transaction.
-
-
- Put the terminal back into Restaurant mode by tapping the grey Menu button on the terminal. Swipe right to left on screen and tap Restaurant Mode on the screen display.
Confirm the refund on Restaurant POS:
- Once you have completed the refund on the terminal, return to the Restaurant POS screen to finalize the refund.
- On the Restaurant POS screen, confirm the refund was successful by selecting Void on the pop-up window.
By default, Moneris terminals have a refund limit of $5,000 for credit card transactions and $0.00 for debit card transactions. To set up or change your refund limit, please contact Moneris directly.
Closing a batch
In order to close out all the credit/debit transactions for the day and send the funds to your account, a batch must be closed on the terminal each day. A batch includes a group of transactions for the applicable business day. Closing a batch sends the payments for processing so the funds appear in your bank account. If your account is set to system close, Moneris automatically closes the batch for you at the end of the business day (11pm local time). If your account is set to merchant close, you must manually close the batch directly on the terminal at the end of your business day. To set up merchant close, please contact Moneris directly.
- To manually close your batch, the terminal must be in standalone mode. Put the terminal in Standalone mode by tapping the grey Menu button on the terminal. Swipe right to left on screen and tap Stand Alone on the screen display.
- From the Main menu, select End of Day and then Close batch.
- Follows the prompts on screen.
- Once complete, your batch details will print out from the device and the batch is now closed. Repeat the process on any other terminals you have.
- Put the terminal back into Restaurant mode by tapping the grey Menu button on the terminal. Swipe right to left on screen and tap Restaurant mode on the screen display.