The Epson TM-T88VI LAN thermal receipt printer connects directly to an internet router with an ethernet cable and DHCP configuration. Users can then print receipts to the TM-T88VI from an iOS device through a shared network connection.

Follow the steps below when setting up your Epson TM-T88VI LAN receipt printer:
- Verify hardware requirements
- Connect the printer to a power supply
- Insert a paper roll
- Print a status sheet
- Connect the printer to your network
- Add the printer to Lightspeed Restaurant
- Test print a receipt
Hardware requirements
To set up your receipt printer, you'll need the following equipment:
- Epson TM-T88VI receipt printer
- Epson PS-180 AC power adapter
- AC power cable
- Ethernet LAN cable (long enough to reach your router)
- Paper roll (58 or 80mm width)
and:
- Router (we recommend routers set up in close proximity to your hardware and printers)
- iOS device installed with the latest Lightspeed Restaurant POS app
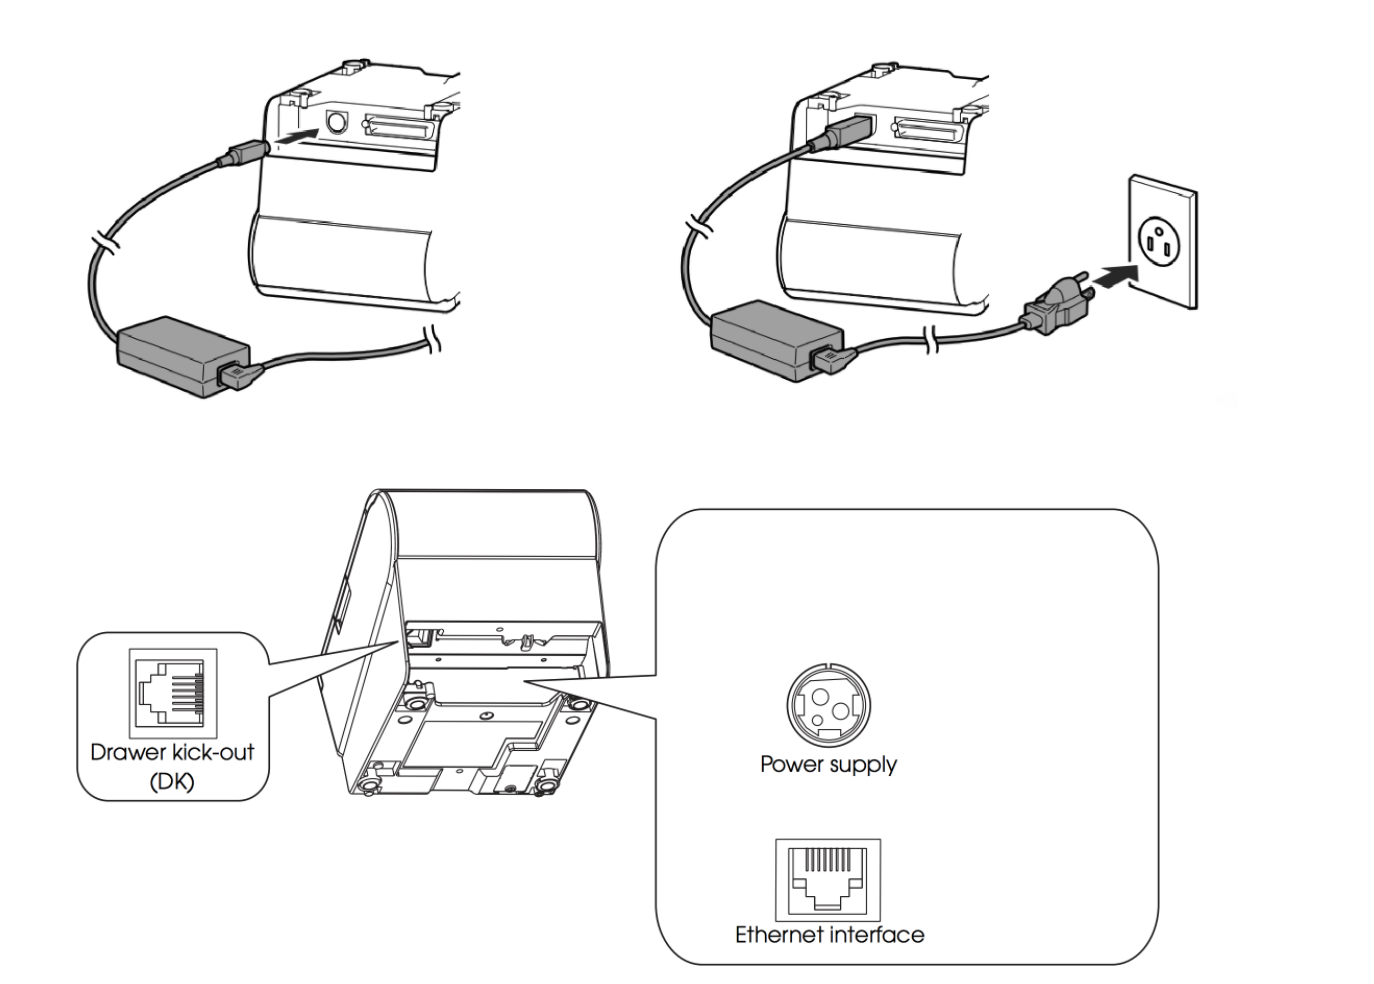
Connect the receipt printer to a power supply
- Make sure you AC cable is not connected to a power supply (unplug if it is).
- Connect the male end of the AC adapter into the circular power port at the bottom of your printer.
- Connect the female end of the AC cable into the pronged AC adapter socket.
- Connect the pronged end of the AC cable into an electrical power supply.
- On top of the printer, press the power button and wait for the blue power light to appear.
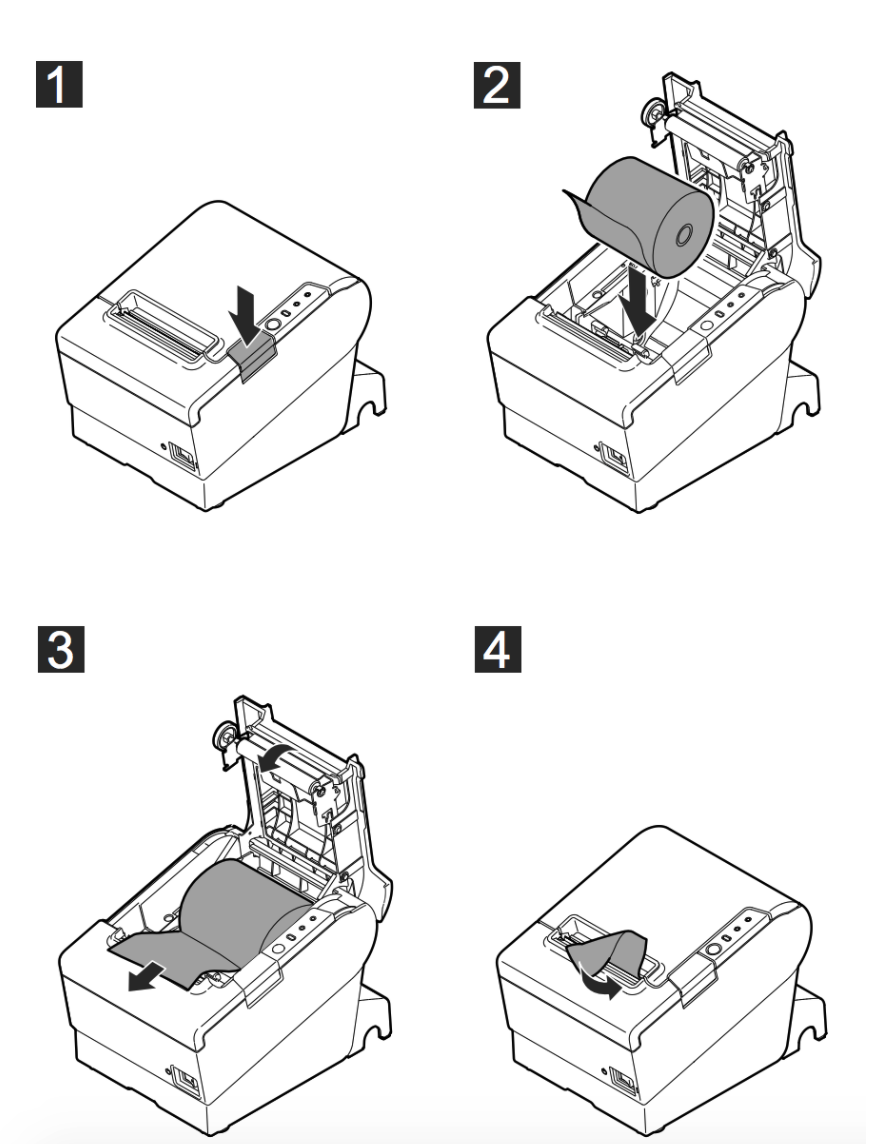
Insert a paper roll
- To open the printer cover, push the lever on the right-hand side of the printer away from you and lift the cover upwards.
- Insert a paper roll with the paper pulling under and out (see image below). While doing so, make sure the paper roll stays taut and doesn't unravel.
- Pull the paper out past the cutter at the front of the printer.
- Push the cover down to snap the lever back into place.
Print a status sheet
In order for the Restaurant POS device to send print jobs to the Epson TM-T88VI, the iOs device and printer both need to be on the same network. Your iPad should be connected (by Wifi or LAN) to your internet, but a TM-T88VI LAN receipt printer needs to be directly connected to your internet router. Once your printer is connected to your router, you are able to configure DHCP settings to ensure your printer and iOS device communicate with one another.
Connect the printer to your router
- Turn off the printer by pressing the power button.
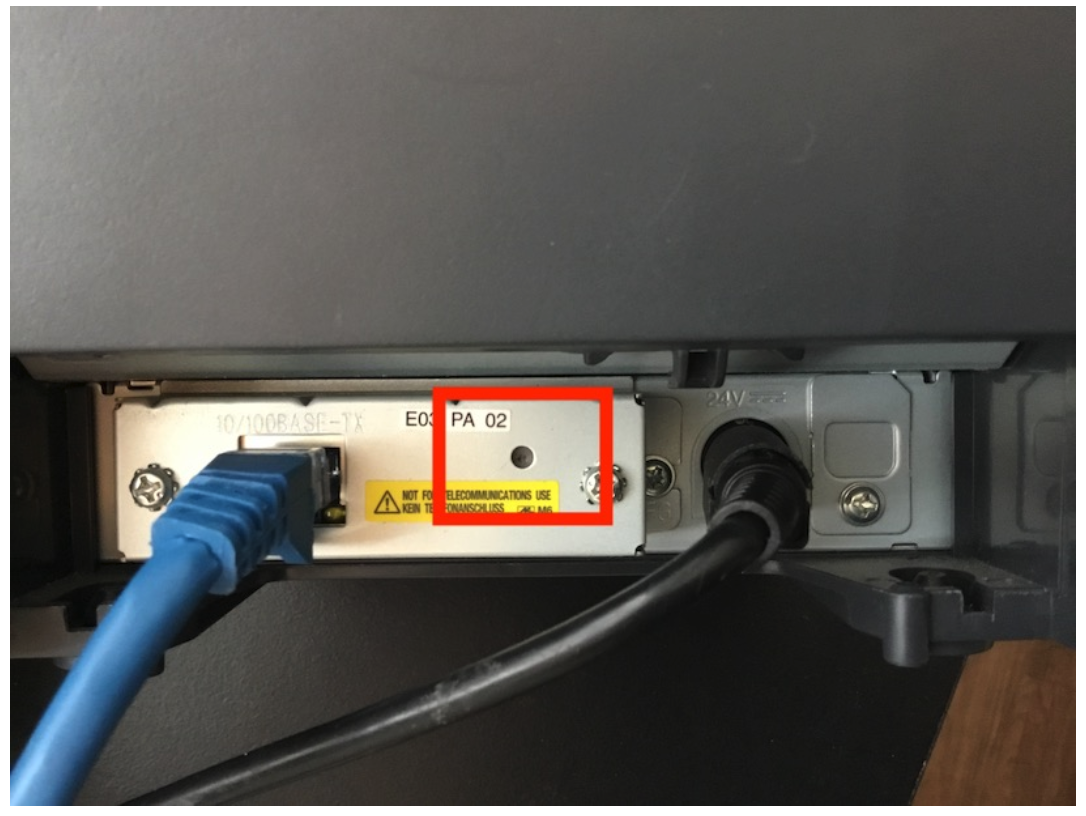
- Connect one end of the ethernet cable to the ethernet port at the bottom of your printer.
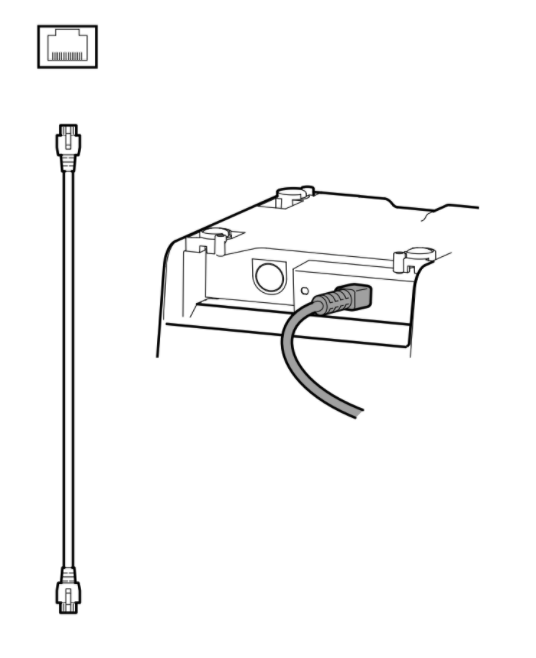
- Connect the other end of the ethernet cable to an ethernet port on your internet router.

Factory Reset the printer
Before beginning DHCP network configuration, it's important to ensure your printer is not connected to another network with another IP address. To ensure the printer is not connected to another network, follow the instructions below to factory reset the printer's network settings:
- Turn off the printer by pressing the power button.
- Turn the printer around and with a pen or pencil tip, push the pinhole reset button on the back of the printer for 4 seconds.
- While pushing the reset button, turn the printer on by pressing the power button.
- After 5 seconds, a ticket will print notifying of a factory reset. Release the reset button.
- After another 5 seconds or so, a network configuration ticket should auto-print with an IP address of 192.168.192.168. This IP address is the default Epson printer ID required in order to configure the printer for your network.
Print a status sheet
If your printer is fresh out of the box, you may not need to begin with a factory reset. Follow the instructions below to print a status sheet, or network configuration ticket. This ticket is required to confirm your printer's network settings. This is also a useful action to understand if you ever need to verify your printer's network settings in the future.
- Ensure the printer is turned on.
- Turn the printer around and with a pen or pencil tip, push the pinhole reset button on the back of the printer for 4 seconds.
- A status sheet should auto-print with an IP address of 192.168.192.168. This is the default Epson IP address required to configure the printer's network settings.
Connect the printer to your network
In order to connect your printer to your internet network, you will need to temporarily change the IP address on your iOS device to the printer's default IP. Then, you will enable DHCP configuration in order to assign the printer an IP address on your network.
Temporarily connect iOS device to printer's IP address
-
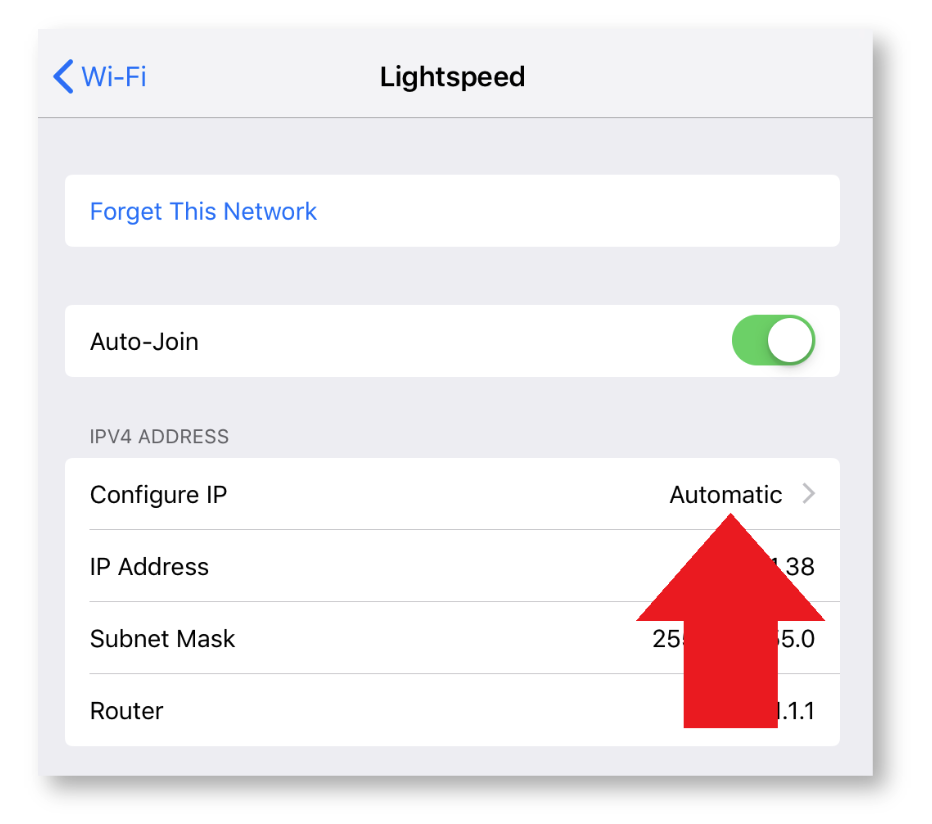
- On the iOS device that you will be printing from, navigate to Settings > Wi-Fi.
- Tap the information icon beside the connected network.
- Tap Configure IP and select Manual.
4. Change the IP address, Subnet Mask and Router according to the network configuration ticket that was printed.
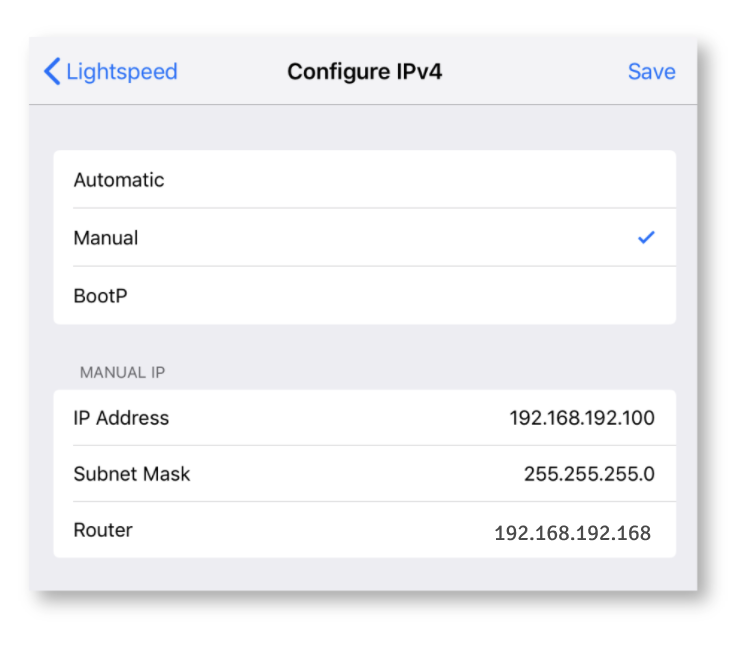
5. Tap Save at the top right corner.
6. Your iOS device is now configured to communicate with your printer. This is required so that you can configure your printer's IP address from the iOS device.
Enable DHCP configuration
Almost there! Now that your printer and iOS device share the same IP address, you can carry out DHCP configuration. This is required so that you can give the printer a dynamic IP address from your network.
- From the iOS device, open a new browser window and tap 192.168.192.168/webconfig into the address field.
- An Epson web configuration login window will appear. To login, on the username field enter epson. On the password field enter epson.
- From the left-hand menu, navigate to the TCP/IP settings category to configure IP settings.
- Change the Get IP address field to Auto. This will populate the IP address field. The IP address is the dynamic address assigned to your printer.
Reconnect the iOS device to your local network
- On your iPad, tap Settings > Wi-Fi.
- On the right Wi-Fi panel, select your network from the list.
- Enter your password and tap Join. Your Wi-Fi network should now be listed under the Wi-Fi switch.

Confirm printer's DHCP configuration
- Turn the printer around and with a pen or pencil tip, push the pinhole reset button on the back of the printer for 4 seconds.
- A status sheet should auto-print with an IP address determined from the DHCP configuration. If the network settings match the settings on the TCP/IP page, the printer is connected to your internet network and ready to be paired with Lightspeed Restaurant.
Add the printer to the Restaurant POS device
- From your iOS device, open the Restaurant POS app and log-in. Go to the Manager page.
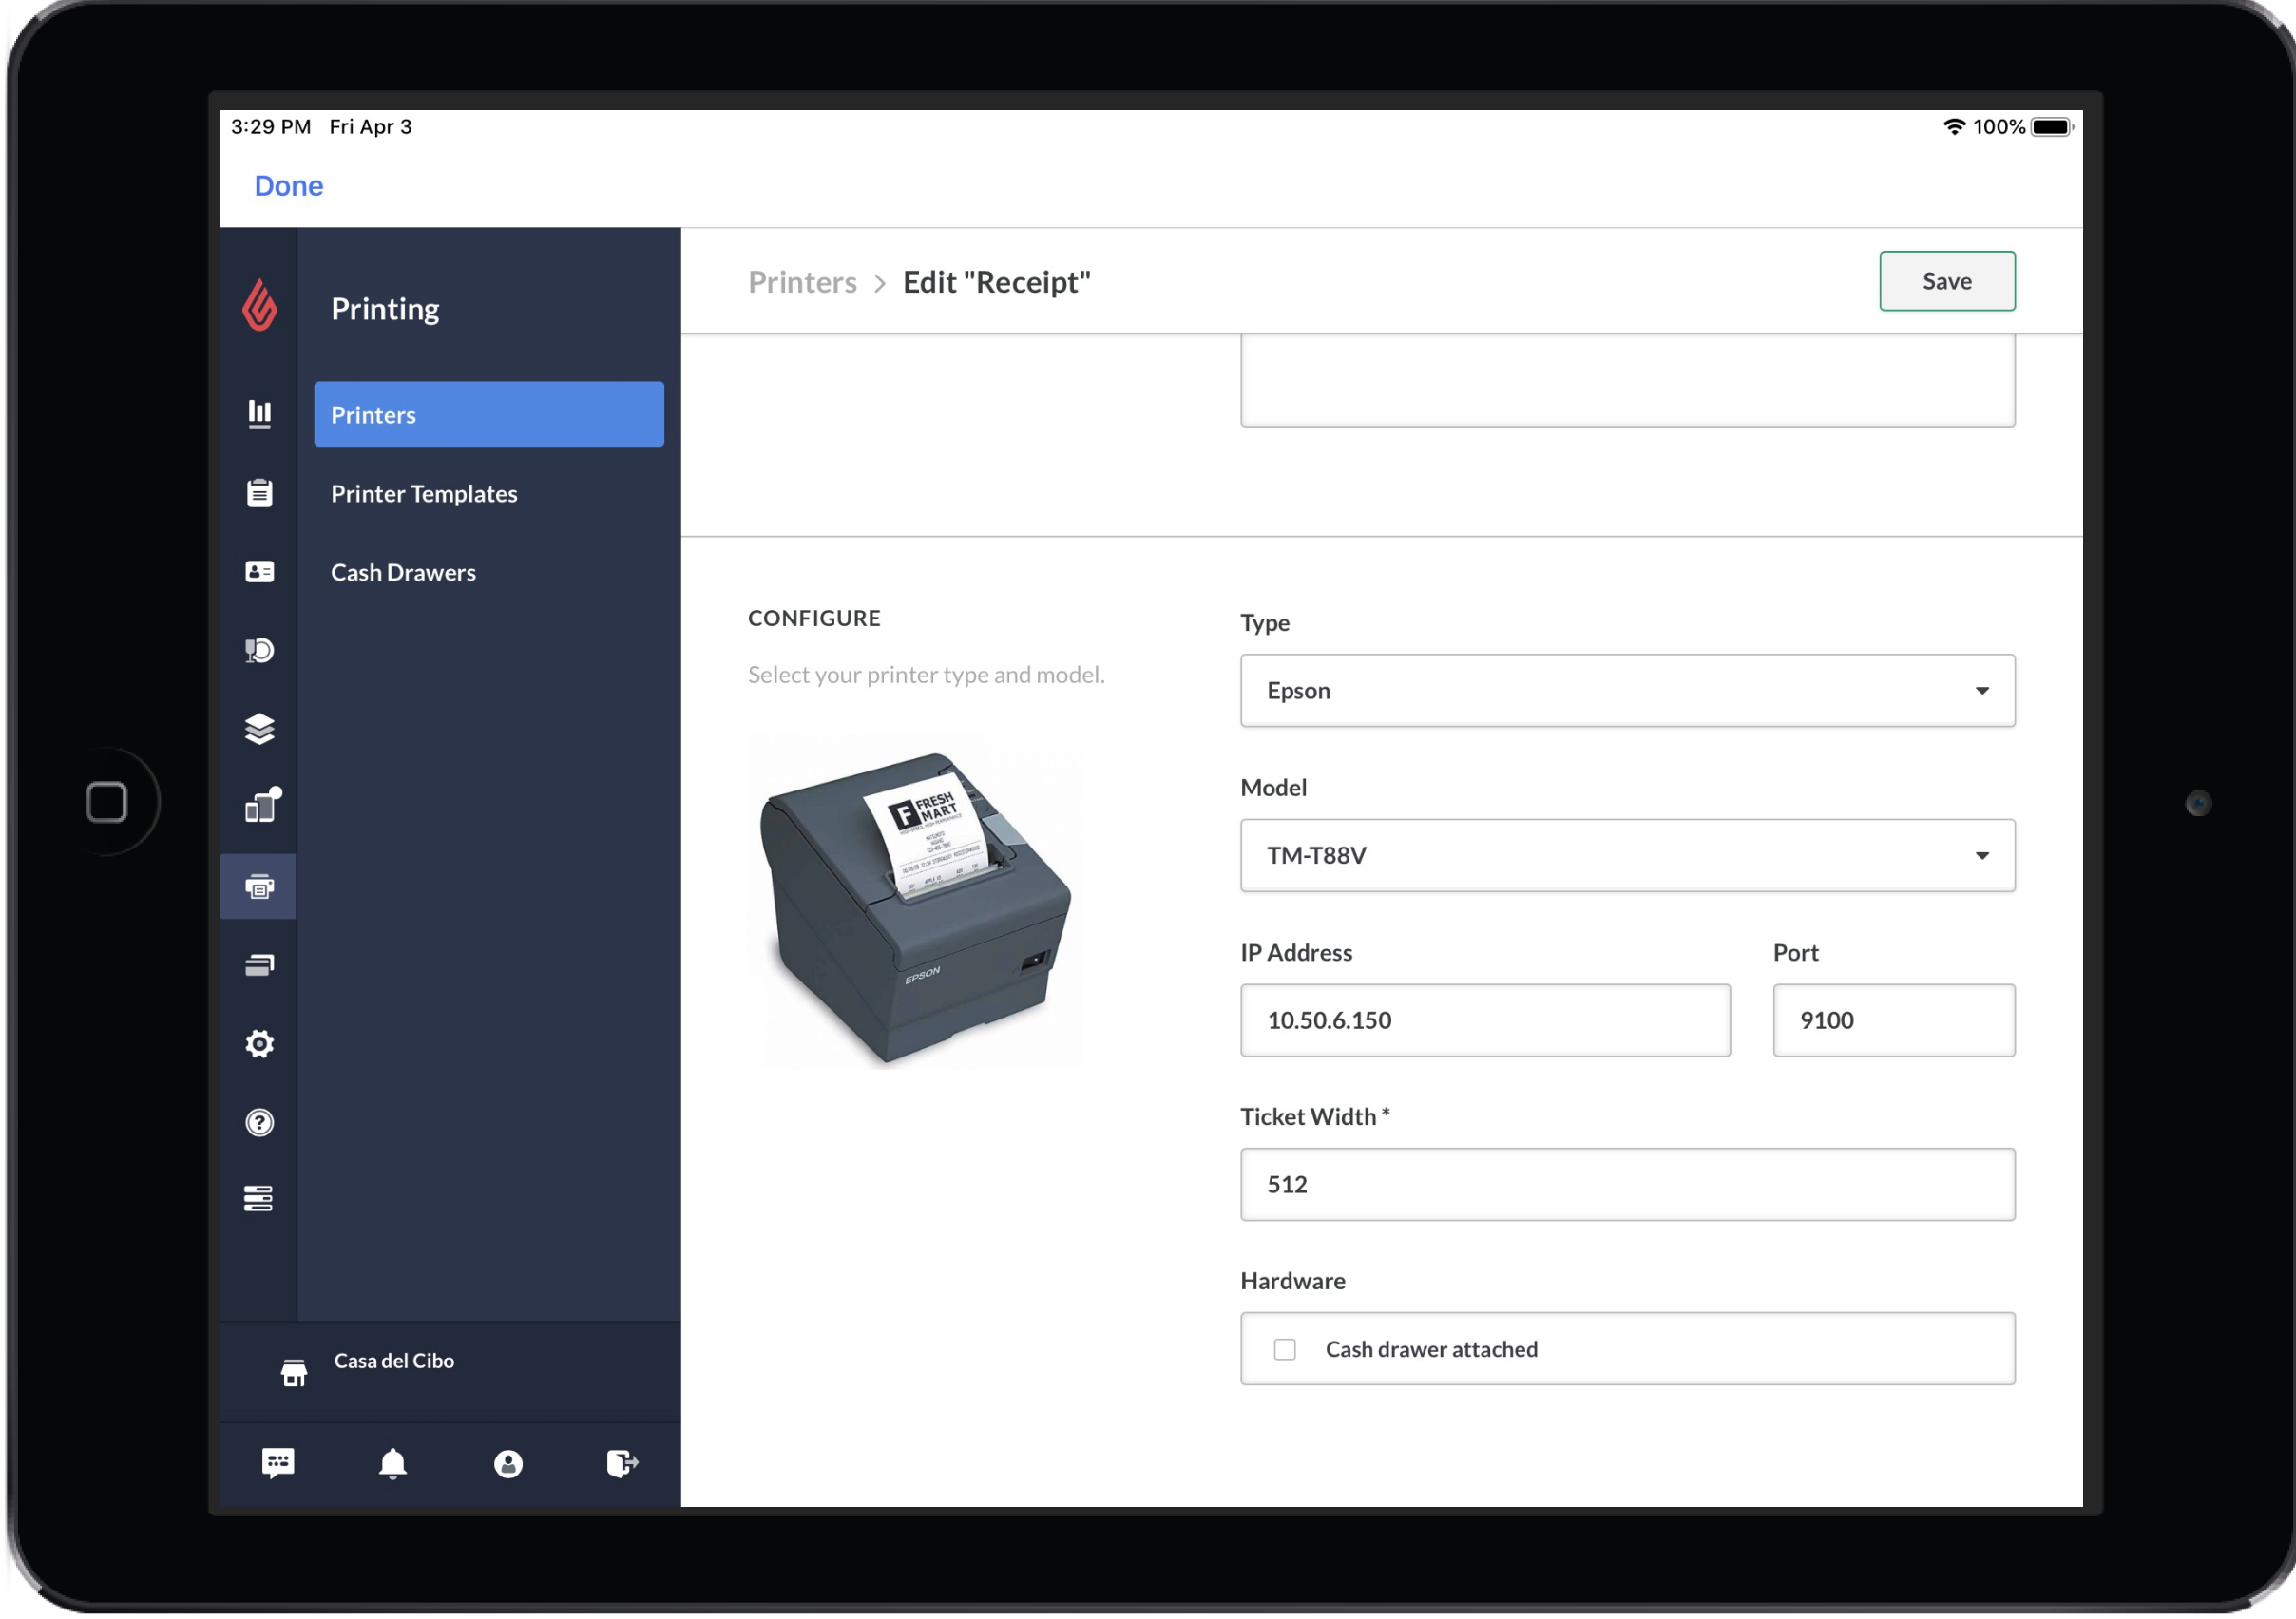
- From Restaurant Manager navigation menu, select Printing > Printers.
- Select the Add New Printer button at the top-right of the screen.
- Give the printer a name based on its function (e.g. Receipt printer).
- Select Epson as the type and TM-T88V as the model from the drop down menus.
- Enter the IP address your printer is connected to. The correct IP address will be on the status sheet printed during the previous step of this article.
- For Lightspeed Restaurant to connect with your printer, the printer's assigned IP address (obtained from a status sheet) must always match the IP address listed on Restaurant Manager.
- Enable the Cash drawer attached setting if you are connecting a cash drawer to this printer.
- Select the Save button at the top-right of the screen.
- On the left-hand menu, select Printer Templates.
- Create or select an existing Receipt printer template.
- In the Edit Printer Template popup, beside the setting Printer, choose Select a Printer.
- Select the new printer by name.
- Select Ok to save.
Print a test receipt
It's a good idea to perform a print test and confirm a connection between the Restaurant POS device and printer. To perform a print test:
- From the User screen on the POS, select Tools.
- Tap Print test.
- All printers configured in Restaurant Manager will show.
- Green: Printer is connected.
- Red: Printer is not connected.
- If the printer is connected (green), tap it to perform a quick print test.
For more information, see Performing a print test.
All set! You're now be able to print receipts from the Restaurant POS device with the Epson TM-T88VI LAN receipt printer.
What's next?
Have you connected your cash drawer? A cash drawer connects directly to a receipt printer. See About cash drawers for more information.