Setting up Lightspeed Accounting 2.0 will streamline your accounting process. Your point-of-sale data will automatically sync to your accounting software according to the sync schedule you set, and you'll have complete control over how that information is mapped to your accounts. To get set up, you'll need to:
- Connect Lightspeed Accounting to your accounting software.
- Set a sync schedule.
- Choose a posting method.
- Map your point-of-sale data to your accounts.
- Configure additional settings.
Connecting to your accounting software
Before mapping your accounts, you'll need to establish the connection between your accounting software and Lightspeed Restaurant.
If you have multiple locations, it is very important that you do not use your master account to establish the link with Lightspeed Accounting. Make sure to use credentials with admin permissions for the child establishment.
Additionally, make sure all users are logged out of your accounting software before beginning this process. If a user is logged in to your accounting software without administrative permissions, Lightspeed Accounting may not integrate with the permissions needed to properly sync your data.
Once all users are logged out of your accounting software:
- Click Accounting in your Restaurant Manager.
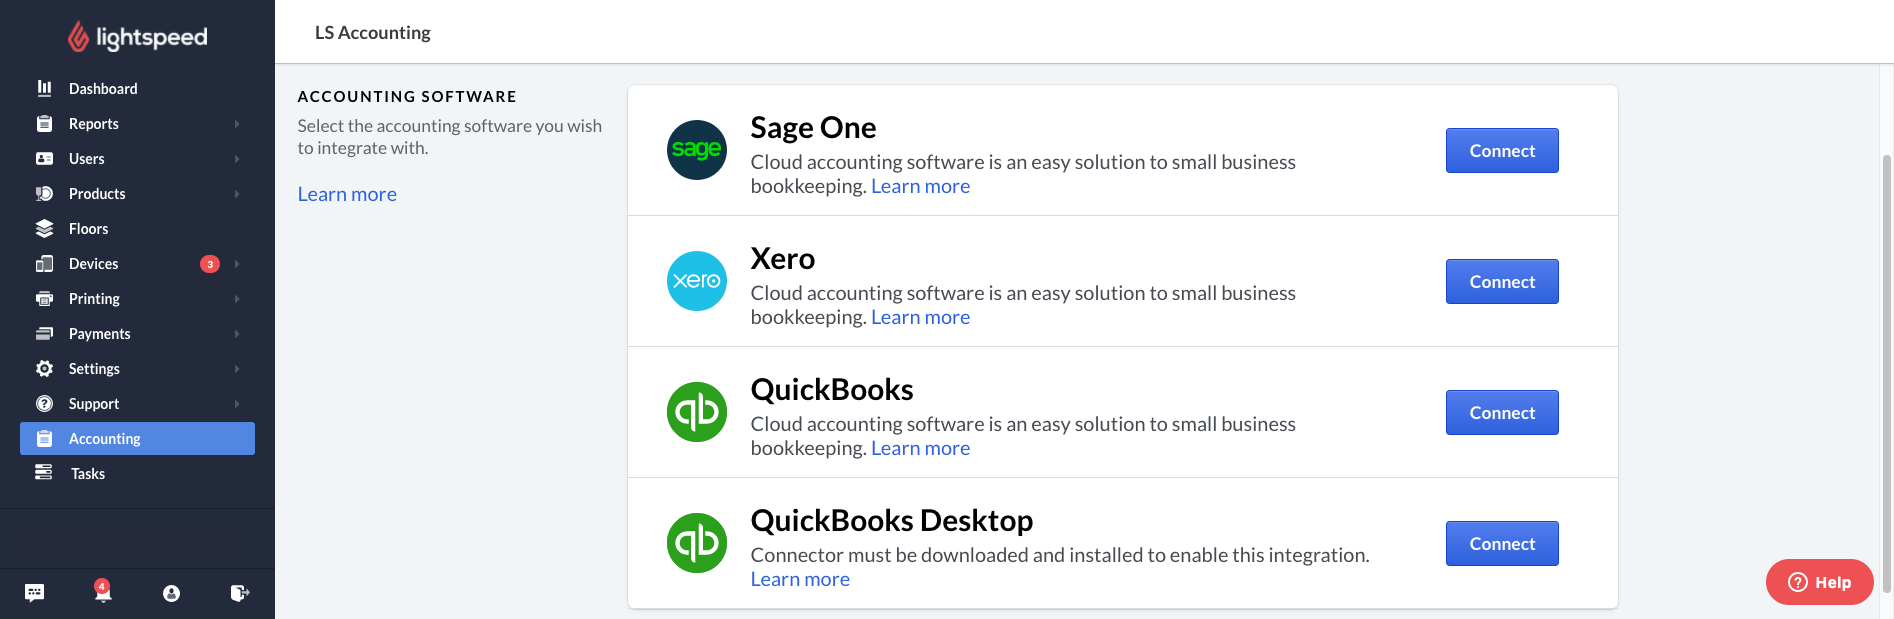
- Click Connect next to your accounting software of choice.
Note: if you use QuickBooks Desktop, please follow these additional steps before clicking connect. - A window will appear asking for your accounting software credentials. It is very important that you enter the credentials for a user with full administrative permissions in your accounting software. Enter these credentials and click Sign in or Log in.

- You will be asked for permission to connect your accounting software to Lightspeed Accounting. Click Connect or Allow access to authorize the integration.
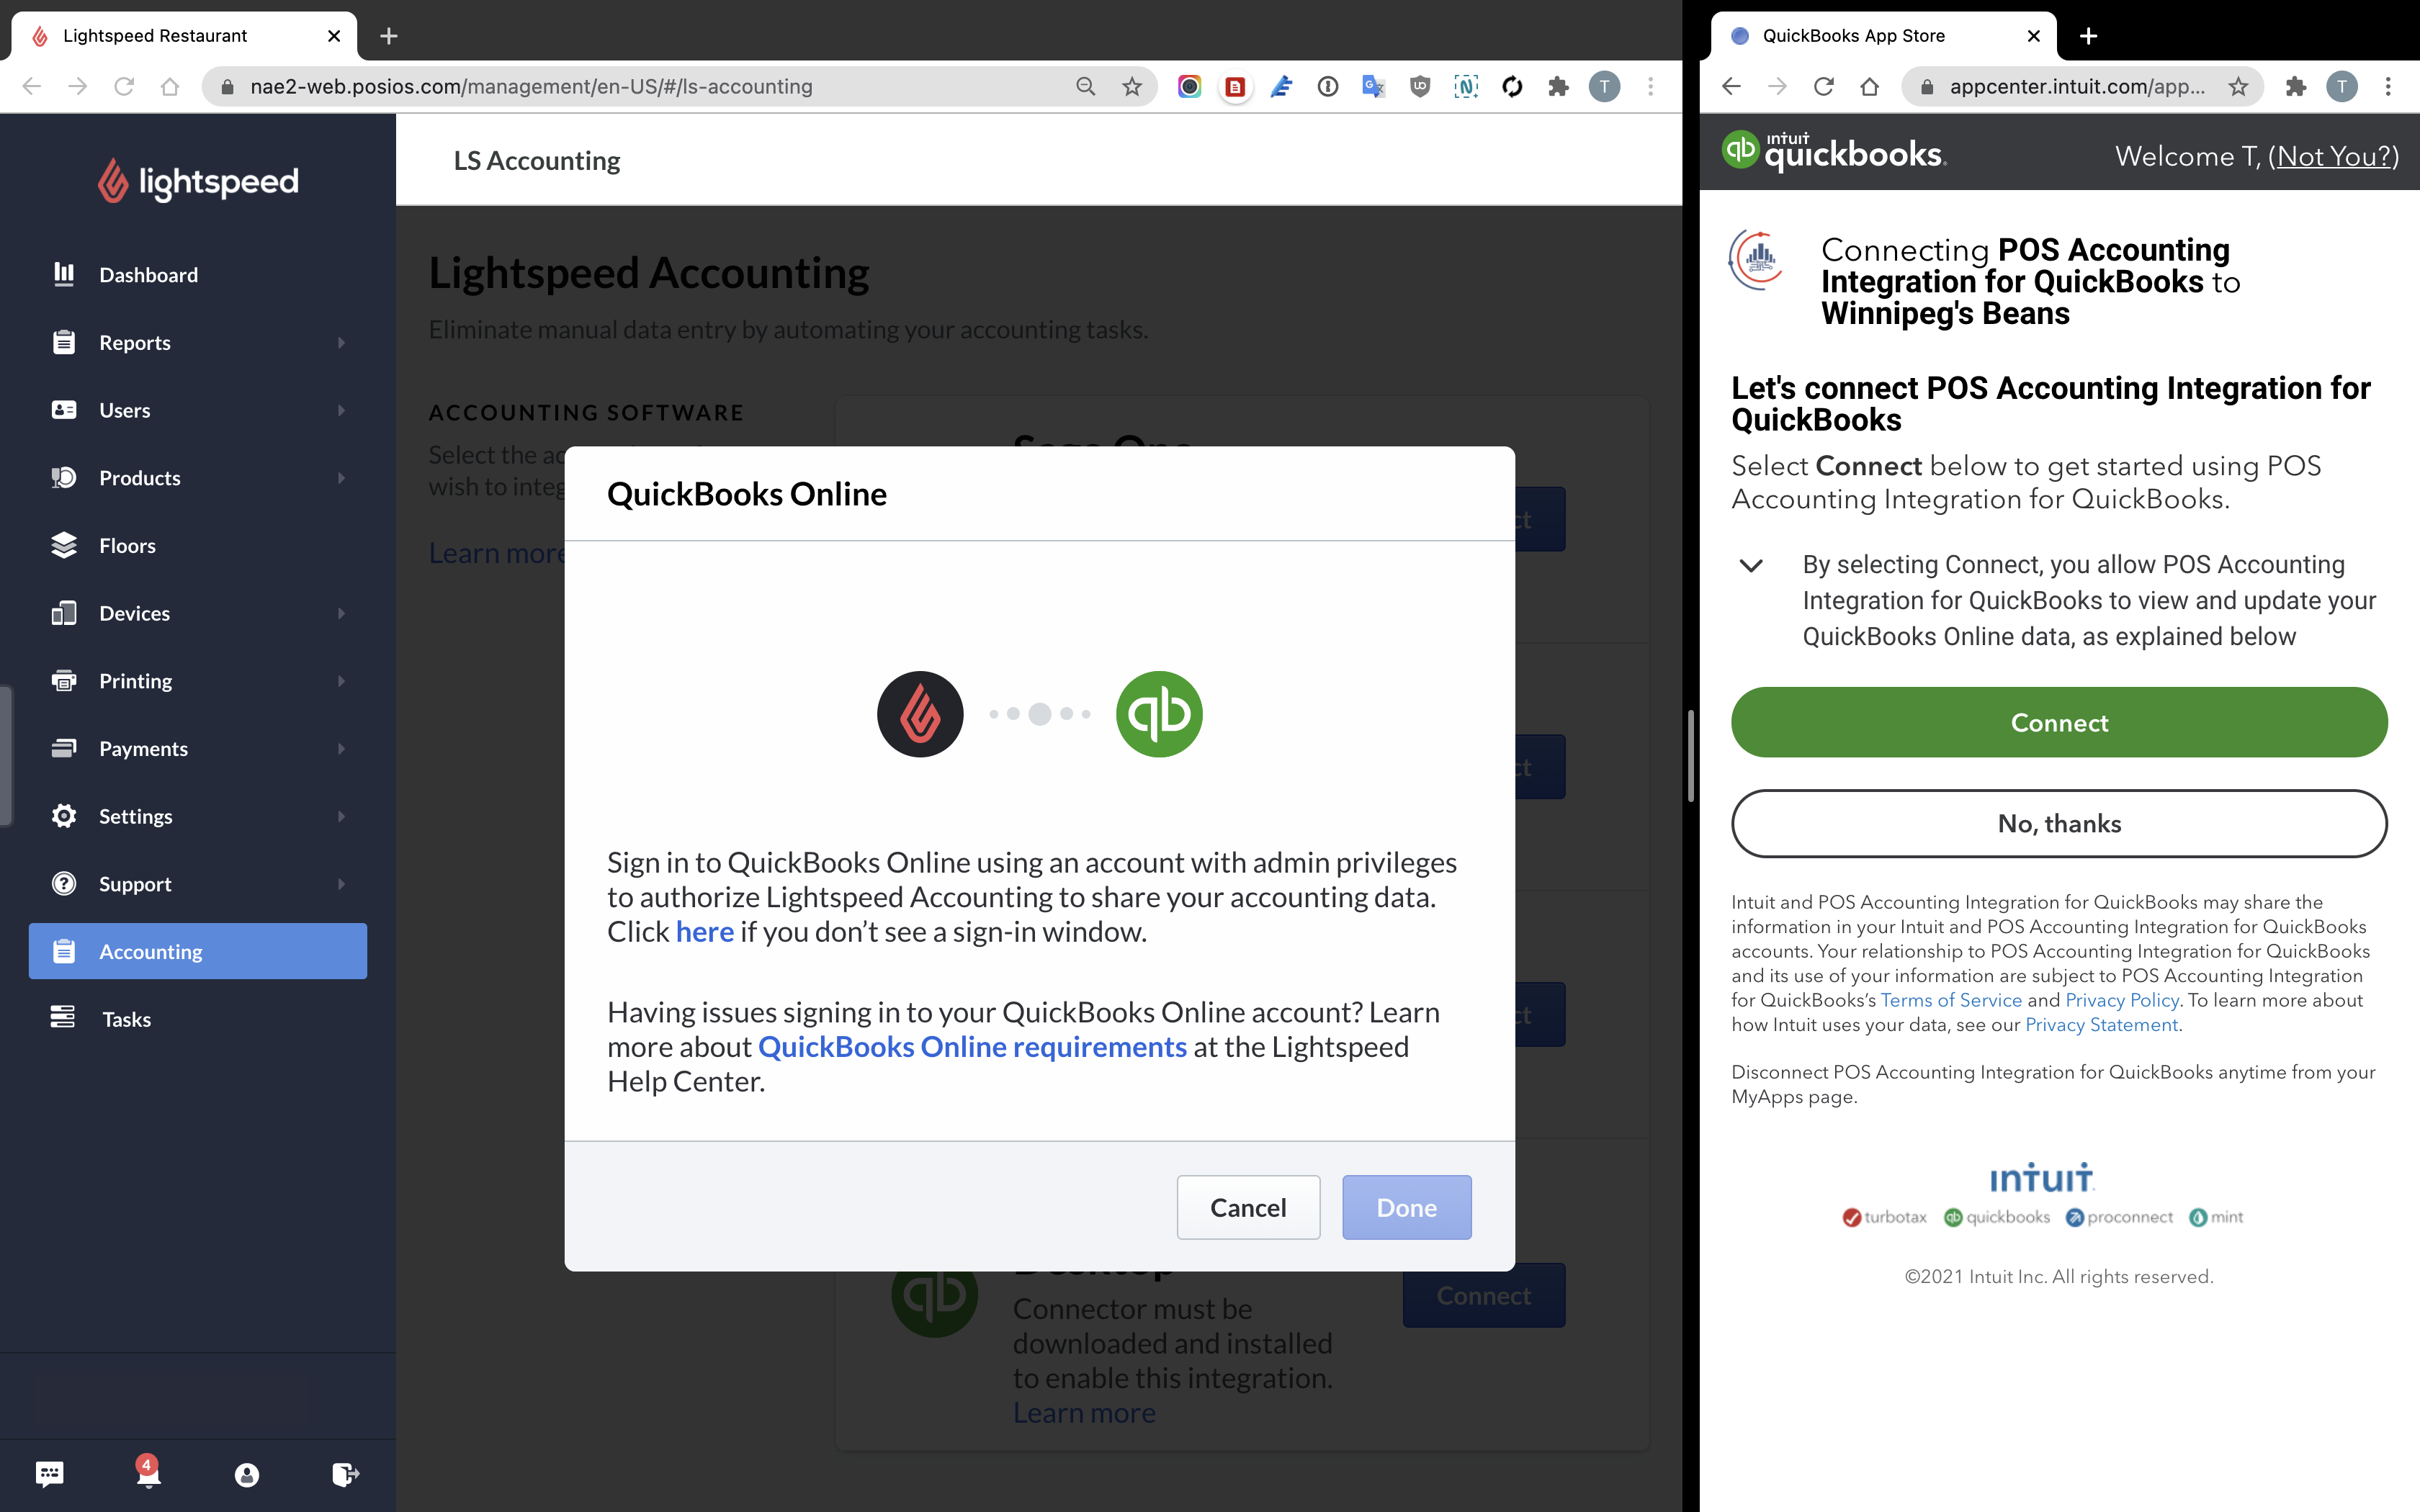
- After a few moments, the connection will be established. Close the new window and click Done.
This establishes the connection between your accounting software and Lightspeed Accounting. You are now ready to set up how your data will sync.
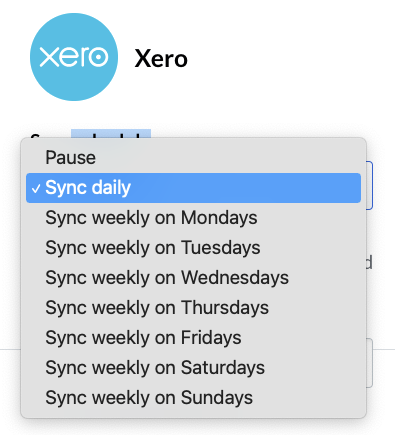
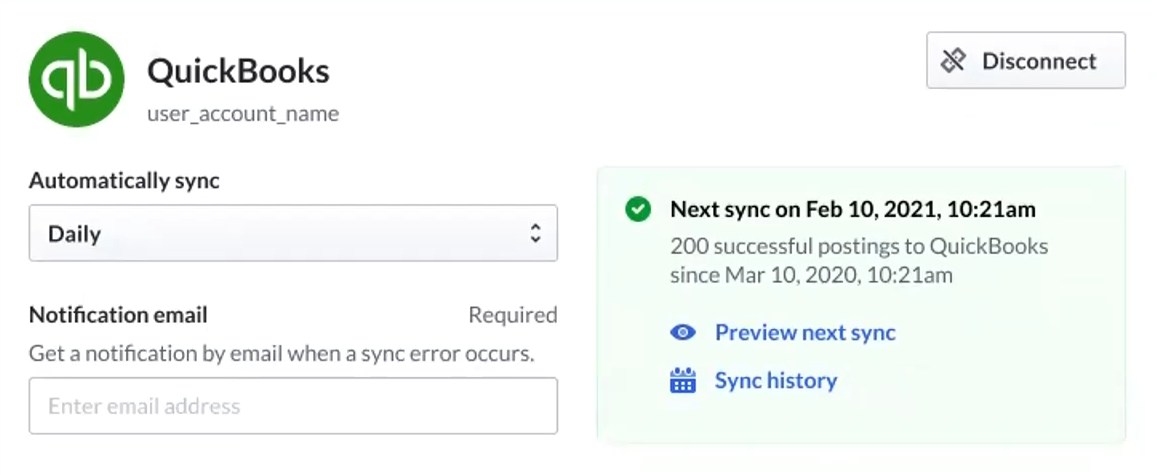
Setting your sync schedule
The first thing you'll need to establish is how frequently you want Lightspeed Accounting to sync your data. You can use the drop-down menu to select from the following options:
- Daily: Your data will sync once every day and will include a 24 hour period based on the opening hours you've established in Lightspeed Restaurant.
- Weekly: Your data will sync every week on the day you select. The sync will include 7 individual end-of-day summaries.
- Pause: Your data will no longer sync until a new sync schedule is selected.
You can also designate an email address for receiving notifications in the event that a sync error has occurred. You will only receive notification emails if your data has failed to sync; there are no emails sent to summarize successful syncs.
Selecting a posting method
Once you've determined how frequently to sync your data, you'll need to establish how your data will sync. Lightspeed Accounting supports four posting methods:
- Journal entry: Lightspeed Accounting will create a general journal entry based on your end-of-day summary and group your product sales by category. Payments will be posted based on your mappings.
- Invoices by categories: Lightspeed Accounting will send an invoice with your daily sales summary and respective payment types. Product sales will be grouped by category.
- Invoices by product: Lightspeed Accounting will send an invoice with your daily sales summary and respective payment types. Product sales will be reported and mapped individually.
Once you've selected a posting method, you can begin mapping your point-of-sale data to your accounts. Note that if you change the posting method, all mappings will be reset and you will have to reconfigure your mappings from scratch.
Mapping
Now that the connections have been established, the path is open to begin syncing your information, however Lightspeed Accounting will still need to know where to send that information in your accounting software. By mapping your accounts, you'll have full control over how your point-of-sale data is recorded in your accounting software.
Please note that while Lightspeed Support is happy to help you set up the integration between Lightspeed Accounting and your accounting software, we are prohibited from providing accounting advice on how to map your accounts. If you are unsure how best to set up your accounts, please consult a certified accountant.
Depending on the accounting software you use, you may have some preliminary steps to complete before you can begin the mapping process.
Enabling Sales Tax in QuickBooks Online
Before mapping, ensure that Sales Tax is enabled in QuickBooks. To do so:
- Open the QuickBooks Online dashboard.
- Navigate to Taxes > Set up sales tax.
- Use the drop-down menus to map each tax rate to a tax code or a G/L account.
Enabling Payments in Xero
Before mapping, ensure that payments have been enabled in Xero. To do so:
- Open Xero.
- Navigate to Accounting > Chart of Account.
- Select G/L account.
- Check enable payments to this account.
- Click Save.
Enabling Sales in Sage Business Cloud
Before mapping, ensure that sales have been enabled in Sage Business Cloud. To do so:
- Open Sage.
- Navigate to More > Financial Settings > Chart of Accounts.
- Select G/L account.
- Check Sales.
- Click Save.
Your mapping options will vary depending on the posting method you've selected.
Mapping under journal entry posting method
With journal entry posting, you'll need to map your sales, payments, taxes, discounts, and tips. At any time, you can click Refresh Accounts to resync which accounts in your accounting software are available for mapping in Lightspeed Accounting. This may be necessary if you created a new account after the last sync.
Sales by category
Your sales will be grouped according to the categories you've established in Lightspeed Restaurant. You must designate a default sales account for all of your sales using the drop-down menu.
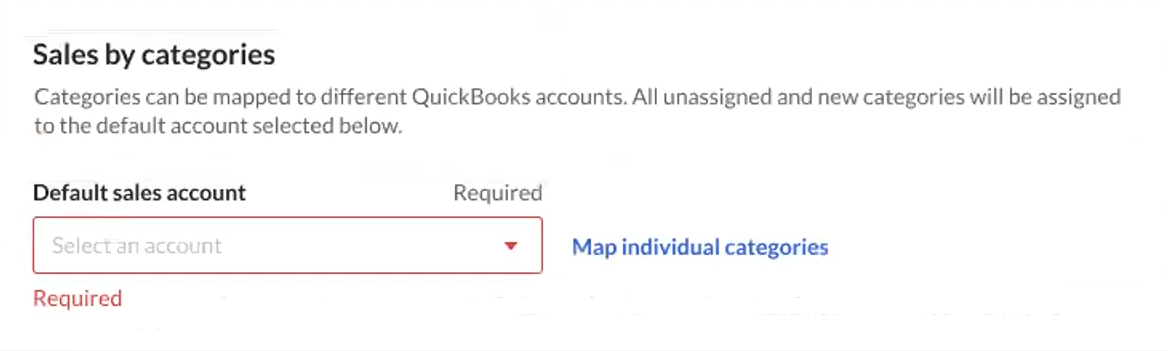
You can then click map individual categories to map as many categories as you like to specific accounts.
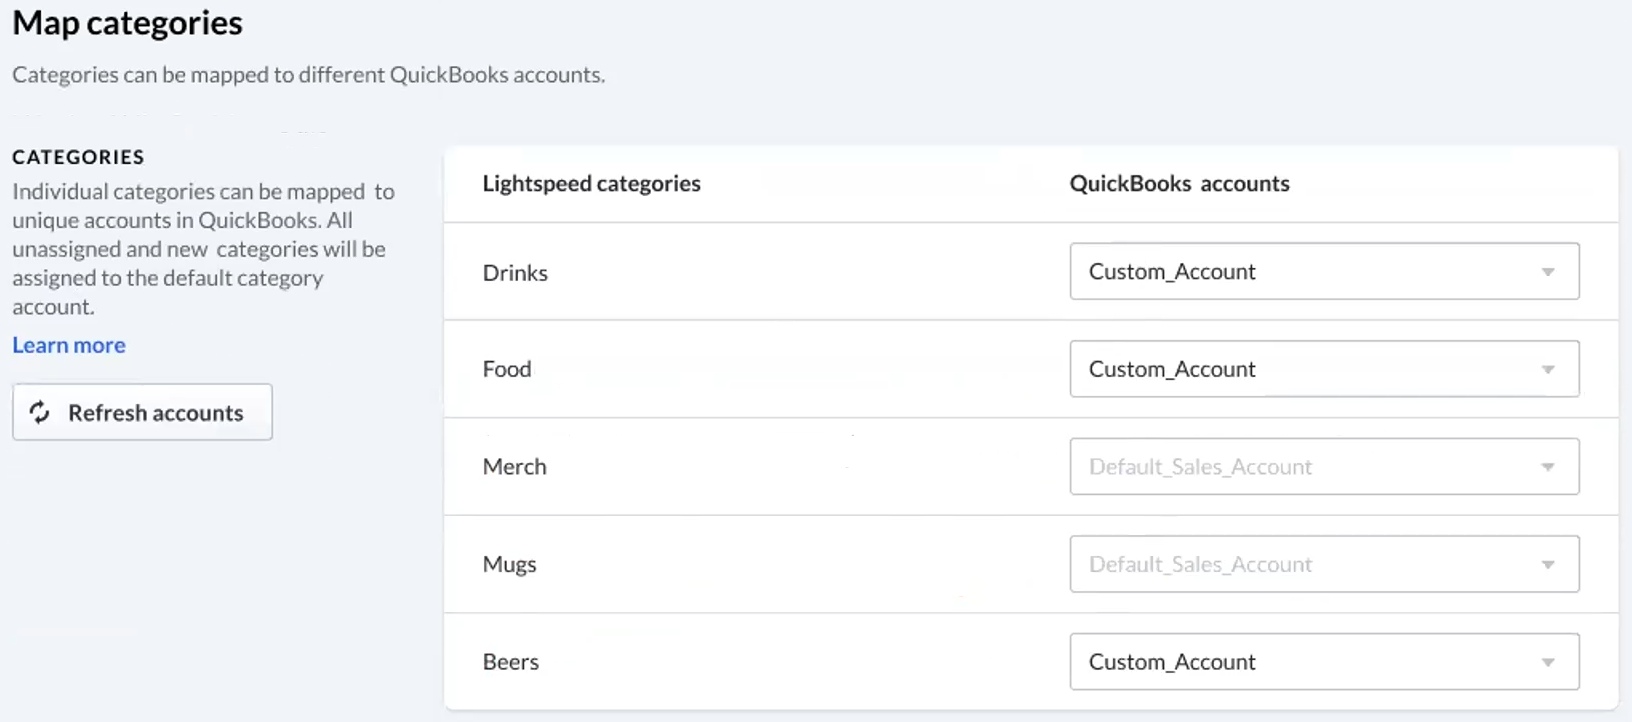
If no individual mapping exists for a given category, sales for that category will be recorded under the default sales account.
Sales are often mapped to an income or sales type account.
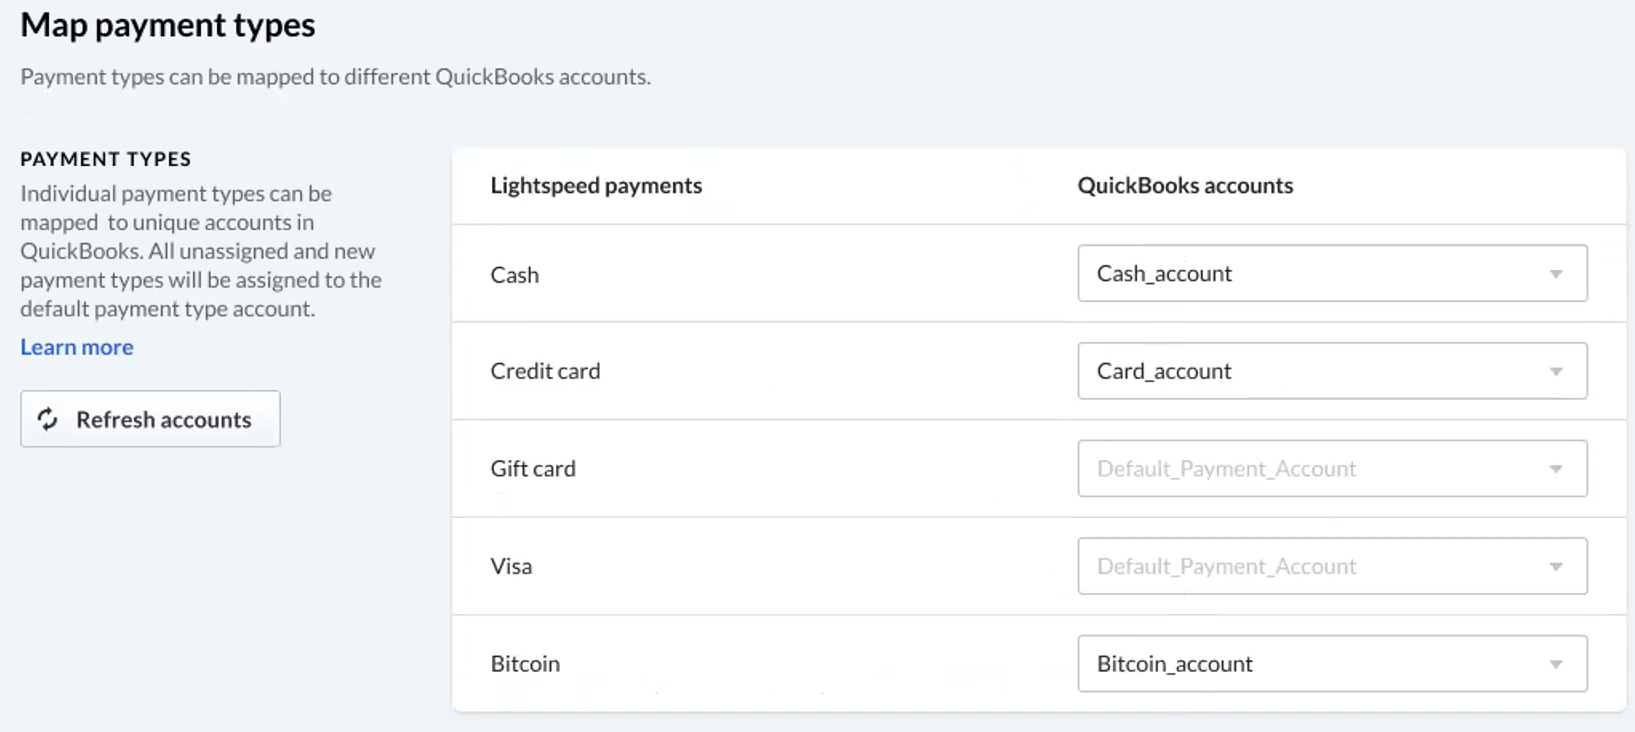
Payments
Your payments can all be mapped to a single account, or you can map according to your payment types.
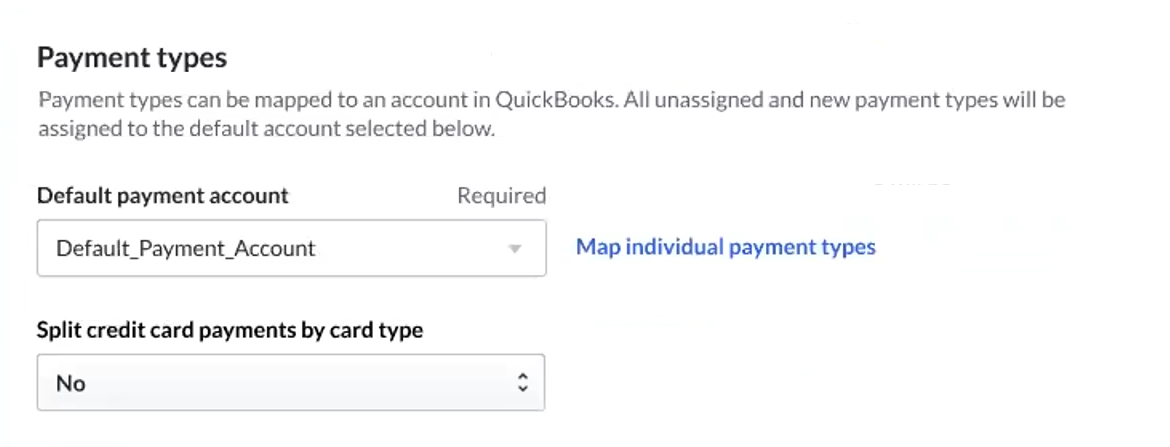
As with your sales, you must designate a default payment account for your payments, however you can then click map individual payment types to designate a specific account for each payment type.
If you prefer to map credit card payments individually by card type, rather than all together under a generic credit card payment type, use the drop-down menu to set split credit card payments by card type to yes.
Payments are often mapped to an asset or bank type account.
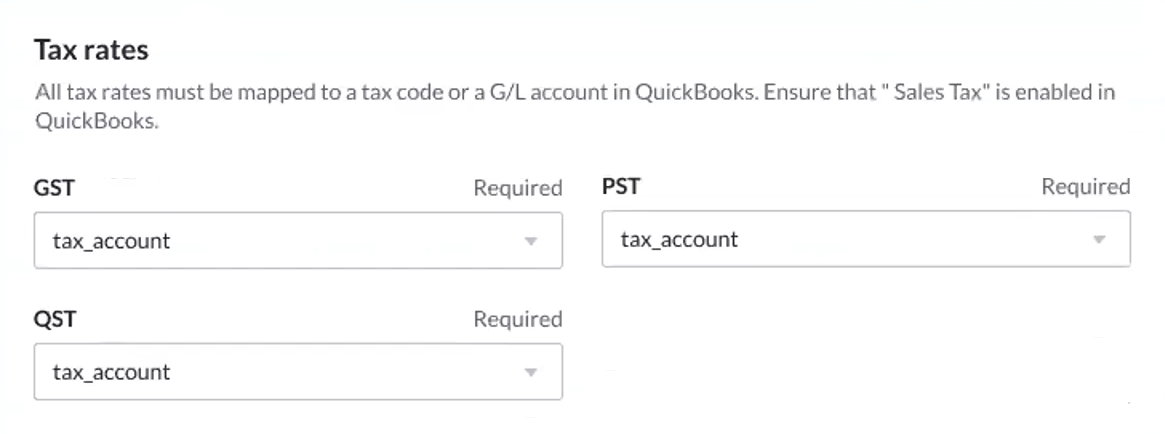
Taxes
Each of the tax rates you've set up in Lightspeed Restaurant must be mapped.
Discounts
Lightspeed Accounting gives you the option to track your discounts separately.
- If disabled, your sales will be recorded with the discount already factored in. The total for a given sale will be the total after discounts have been applied.
- If enabled, discounts will appear as a separate record and can be mapped independently from your sales data.
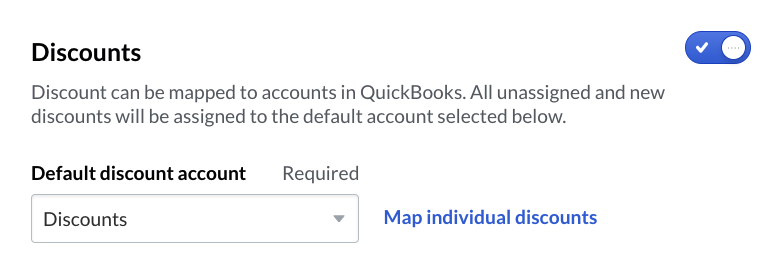
If you choose to enable discounts, you must designate a default discount account. You may then click map individual discounts to designate specific accounts for each discount.
Use the toggle to enable or disable discount tracking.
Tips
Tips will appear as a tax-exempt line item called Gratuity. Tips are often mapped to a Liability account.
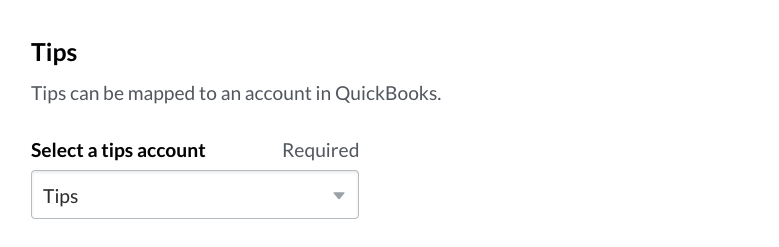
Use the drop-down menu to select the account you'd like to map tips to.
Mapping under invoices by category posting method
With invoices by category posting, you'll need to map your sales, payments, taxes, discounts, and tips. At any time, you can click Refresh Accounts to resync which accounts are available for mapping in Lightspeed Accounting. This may be necessary if you created a new account in your accounting software after the last sync.
Sales by category
Your sales will be grouped according to the categories you've established in Lightspeed Restaurant. You must designate a default sales account for all of your sales using the drop-down menu.
You can then click map individual categories to map as many categories as you like to specific accounts.
If no individual mapping exists for a given category, sales for that category will be recorded under the default sales account.
Sales are often mapped to an income or sales type account.
Payments
Your payments can all be mapped to a single account, or you can map according to your payment types.
As with your sales, you must designate a default payment account for your payments, however you can then click map individual payment types to designate a specific account for each payment type.
If you prefer to map credit card payments individually by card type, rather than all together under a generic credit card payment type, use the drop-down menu to set split credit card payments by card type to yes.
Payments are often mapped to an asset or bank type account.
Taxes
Each of the tax rates you've set up in Lightspeed Restaurant must be mapped.
Discounts
Lightspeed Accounting gives you the option to track your discounts separately.
- If disabled, your sales will be recorded with the discount already factored in. The total for a given sale will be the total after discounts have been applied.
- If enabled, discounts will appear as a separate record and can be mapped independently from your sales data.
If you choose to enable discounts, you must designate a default discount account. You may then click map individual discounts to designate specific accounts for each discount.
Use the toggle to enable or disable discount tracking.
Tips
Tips will appear as a tax-exempt line item called Gratuity. Tips are often mapped to a Liability account.
Use the drop-down menu to select the account you'd like to map tips to.
Mapping under invoices by product posting method
With invoices by product posting, you'll need to map your sales, payments, taxes, discounts, and tips. At any time, you can click Refresh Accounts to resync which accounts are available for mapping in Lightspeed Accounting. This may be necessary if you created a new account in your accounting software after the last sync.
Sales by product
Your sales will be recorded by product, and you'll have the option to map individual products to separate accounts, with any unmapped products defaulting to a designated account.
You likely have hundreds or thousands of products in Lightspeed Restaurant and it would not be feasible to map them all individually. This posting method is best used if you have a handful of specific products that need to be accounted for separately from the rest of your products. Plan to map only your exceptions individually, with the rest of your products falling under a designated default sales account, which you can select using the drop-down menu.
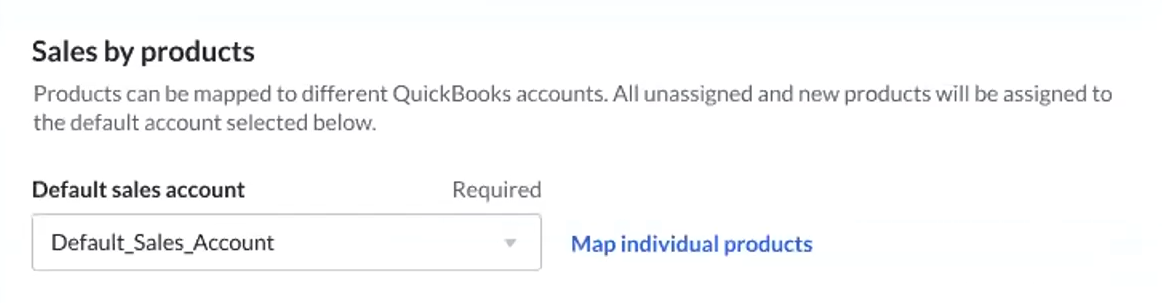
You can then click map individual products to map your exceptions to specific accounts.
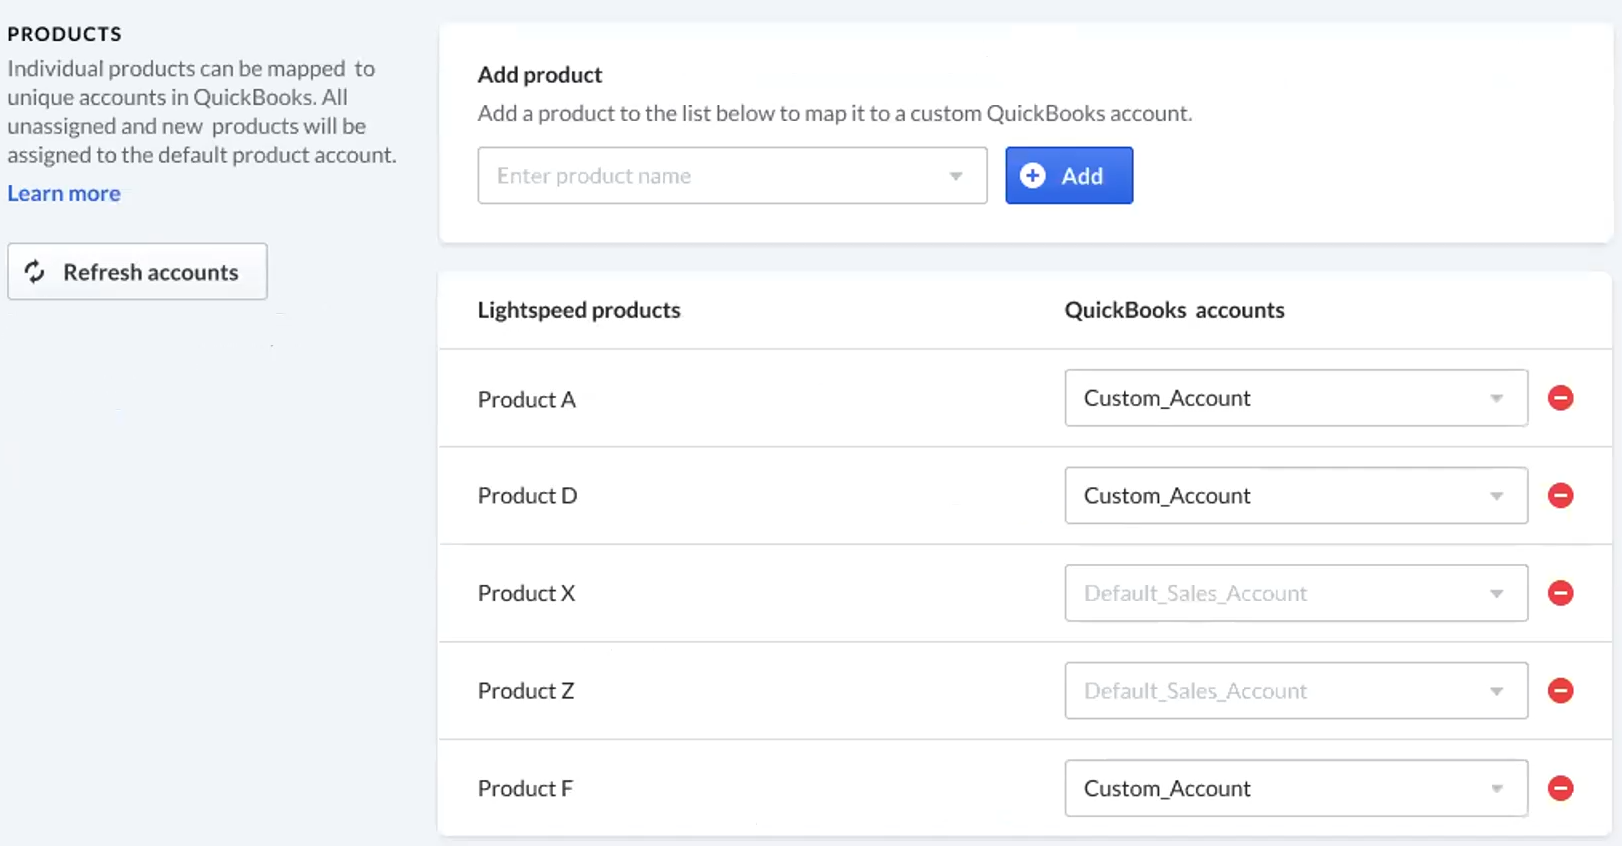
If no individual mapping exists for a given product, sales for that product will be recorded under the default sales account.
Sales are often mapped to an income or sales type account.
Payments
Your payments can all be mapped to a single account, or you can map according to your payment types.
As with your sales, you must designate a default payment account for your payments, however you can then click map individual payment types to designate a specific account for each payment type.
If you prefer to map credit card payments individually by card type, rather than all together under a generic credit card payment type, use the drop-down menu to set split credit card payments by card type to yes.
Payments are often mapped to an asset or bank type account.
Taxes
Each of the tax rates you've set up in Lightspeed Restaurant must be mapped.
Discounts
Lightspeed Accounting gives you the option to track your discounts separately.
- If disabled, your sales will be recorded with the discount already factored in. The total for a given sale will be the total after discounts have been applied.
- If enabled, discounts will appear as a separate record and can be mapped independently from your sales data.
If you choose to enable discounts, you must designate a default discount account. You may then click map individual discounts to designate specific accounts for each discount.
Use the toggle to enable or disable discount tracking.
Tips
Tips will appear as a tax-exempt line item called Gratuity. Tips are often mapped to a Liability account.
Use the drop-down menu to select the account you'd like to map tips to.
Additional settings
Regardless of your choice of posting method, there are some additional settings to consider.
Default customer
You must designate a default customer in Lightspeed Accounting. This should be something generic ("Anonymous Customer," for example), as this is the name that will appear in the customer field for any sale that does not specify a customer name.
Custom transaction number
This optional setting allows you to designate a 4-digit prefix that will be added to your invoice numbers. This can help you keep your invoices in sequential order if you previously used a different accounting system.
Class
Whether or not classes are available will depend on the accounting software you use, and they vary slightly from software to software. Generally speaking, classes allow you to add another dimension by which to track your data. This can be useful if you have multiple locations and are using the same account for all of them. Refer to your accounting software's support site to learn more.
Ready to sync
When you've configured everything to your liking, click Save changes. Lightspeed Accounting will then sync your data to your accounting software according to the sync schedule you selected. We recommend checking how things look in your accounting software after your first sync to make sure everything has been recorded to your liking.
You can make adjustments to your sync settings at any time, however those adjustments will not be retroactive, and changing the posting method will require you to reconfigure every setting.
You can see when the next sync is schedule at the top of the configuration page.
In the event of a sync error, you will receive a notification at the designated email address and the page will display an error notice.
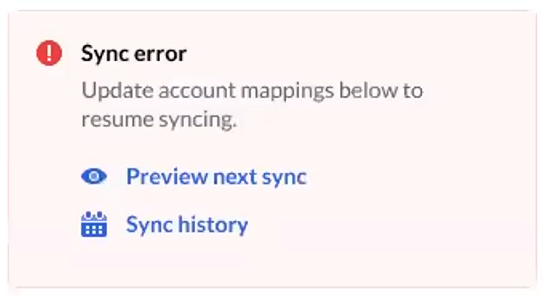
If an error occurs, scroll down the configuration page and look for fields that are highlighted in red. These fields will require your attention to correct. Once you've added the missing information, click save changes.
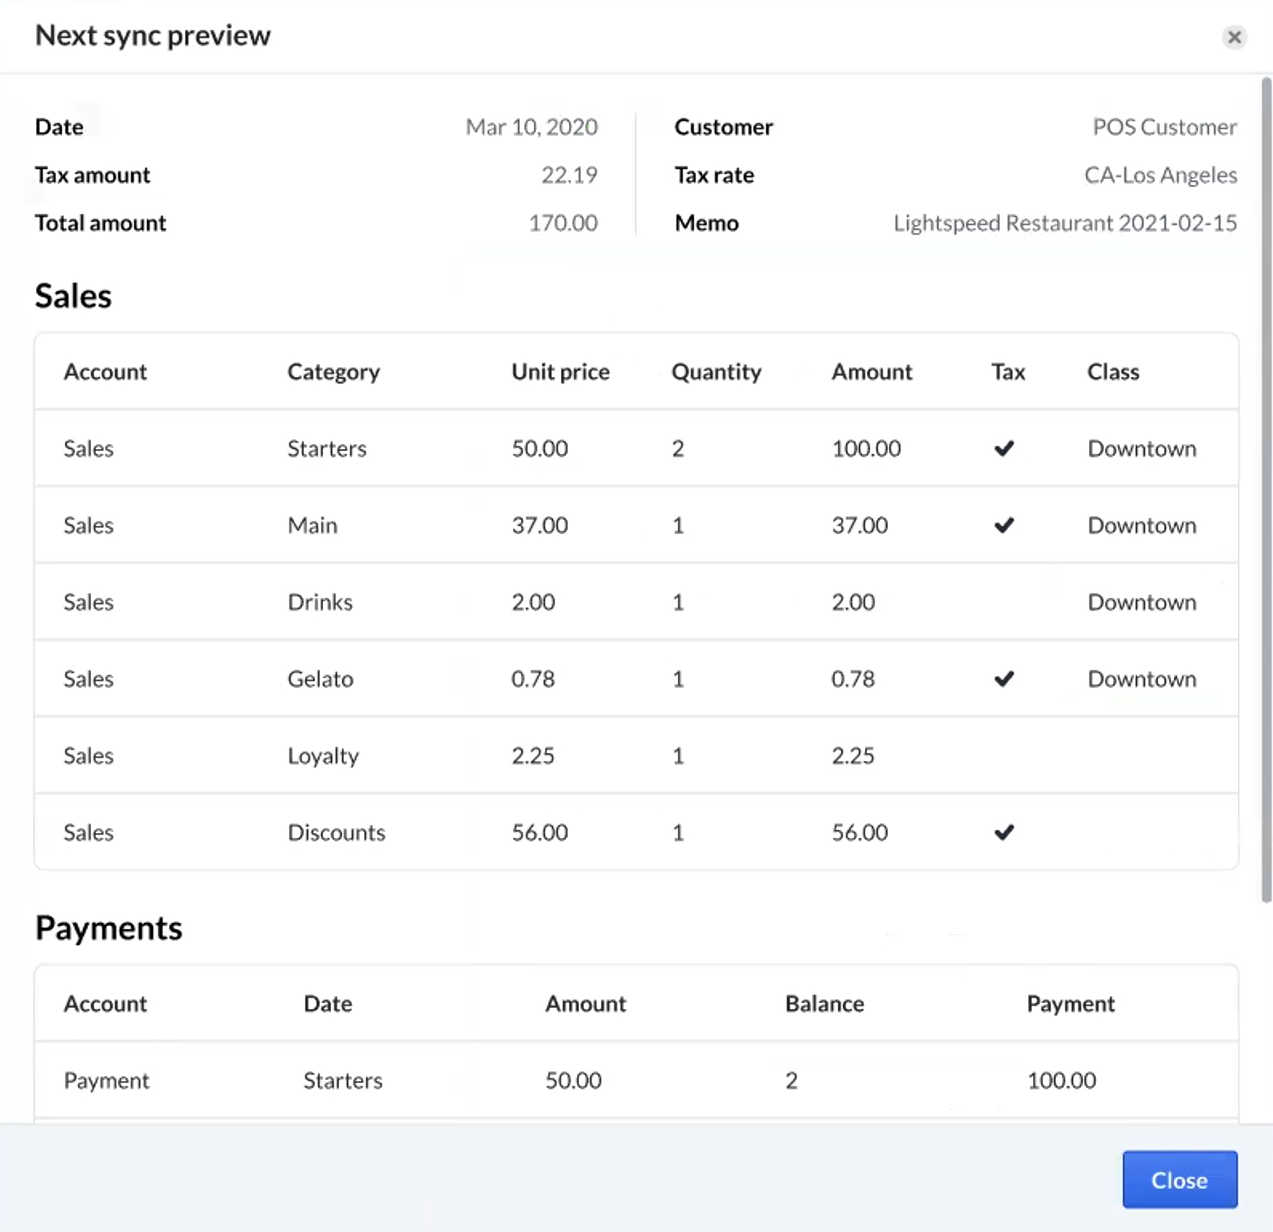
You can ensure the necessary changes have resolved the issue by clicking preview next sync and examining the information.
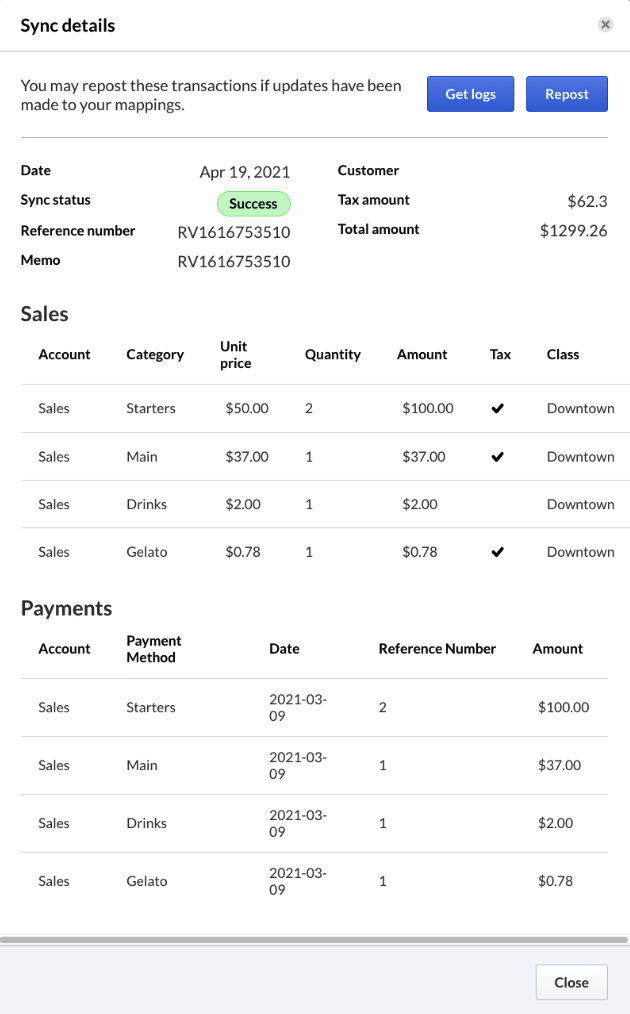
Reposting and resyncing
If you've made adjustments to the way your data is posted in your accounting software or you've reconfigured your settings to correct a syncing error, your can repost or resync previous postings.
To resync a failed posting after you've corrected the configuration:
- Click sync history.
- Locate the failed sync.
- Click on the failed sync to open the sync details page.
- Click Resync.
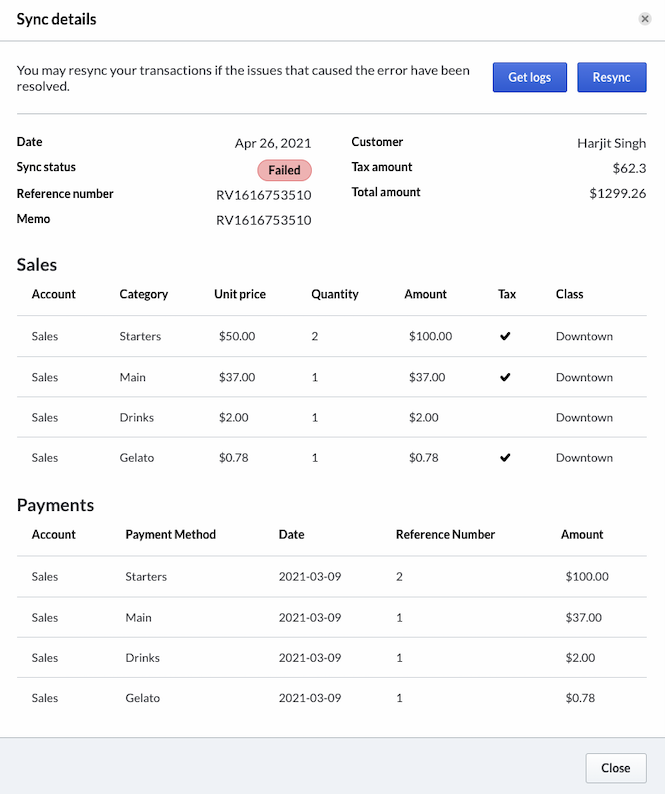
Lightspeed Accounting will attempt to sync the failed posting according to the corrected configuration within the next 30 minutes.
You may have successfully synced information and then adjusted your preferences and wish to resync that data to align with your new settings. This can be done, however the new sync will not overwrite the old sync.
Before reposting previously synced data, you must first delete the data in question from your accounting software. If you do not, you will double-post the data and throw off your accounting.
To repost data:
- Delete the data in your accounting software for the date in question.
- Click sync history.
- Click on the posting for the date you wish to repost.
- Click Repost.
Lightspeed Accounting will attempt to sync the posting according to your new configuration within the next 30 minutes. Once again, this will not overwrite the data that had already been posted for this date -- that information will need to be removed from your accounting software manually.
Disconnecting Lightspeed Accounting
In the event that you've changed your accounting software, you can disconnect the integration to your previous software by navigating to the Accounting section of the Restaurant Manager and clicking Disconnect. This will allow you to select a new accounting software and begin a new configuration.